Recursive React tree component implementation made easy

The Challenges That I’ve Faced and How I Solved Them
When I was building tortilla.acedemy’s diff page, I was looking to have a tree view that could represent a hierarchy of files, just like Windows’ classic navigation tree. Since it was all about showing a git-diff, I also wanted to have small annotations next to each file, which will tell us whether it was added, removed, or deleted. There are definitely existing for that out there in the echo system, like Storybook’s tree beard, but I’ve decided to implement something that will work just the way I want right out of the box, because who knows, maybe someone else will need it one day.
This is how I wanted my tree’s API to look like:
import React from 'react'
import FSRoot from 'react-fs-tree'

const FSTree = () => (
  <FSRoot
    childNodes={[
      { name: 'file' },
      { name: 'added file', mode: 'a' },
      { name: 'deleted file', mode: 'd' },
      { name: 'modified file', mode: 'm' },
      {
        name: 'folder',
        opened: true,
        childNodes: [{ name: 'foo' }, { name: 'bar', selected: true }, { name: 'baz' }]
      }
    ]}
  />
)

export default FSTree
During my implementation of that tree I’ve faced some pretty interesting challenges, and I have thought to write an article about it and share some of my insights; so let’s cut to the chase.
Architecture
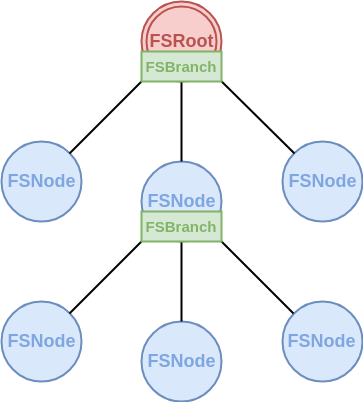
My tree is made out of 3 internal components:
- FSRoot (see FSRoot.js) - This is where the tree starts to grow from. It’s a container that encapsulates internal props which are redundant to the user (like props.rootNode, props.parentNode, etc) and exposes only the relevant parts (like props.childNodes, props.onSelect, etc). It also contains a tag which rules that are relevant nested components.
- FSBranch (see FSBranch.js) - A branch contains the list that will iterate through the nodes. The branch is what will give the tree the staircase effect and will get further away from the edge as we go deeper. Any time we reveal the contents of a node with child nodes, a new nested branch should be created.
- FSNode (see FSNode.js) - The node itself. It will present the given node’s metadata: its name, its mode (added, deleted or modified), and its children. This node is also used as a controller to directly control the node’s metadata and update the view right after. More information about that further this article.

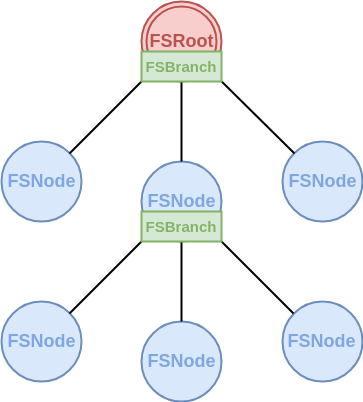
The recursion pattern in the diagram above is very clear to see. Programmatically speaking, this causes a problematic situation where each module is dependent on one another. So before FSNode.js was even loaded, we import it in FSBranch.js which will result in an undefined module.
/* FSBranch.js - will be loaded first */
import React from 'react';
import FSNode from './FSNode';

// implementation...

export default FSBranch;

/* FSNode.js - will be loaded second */
import React from 'react';
// The following will be undefined since it's the caller module and was yet to be loaded
import FSBranch from './FSBranch';

// implementation...

export default FSNode;
There are two ways to solve this problem:
- Switching to CommonJS and move the
require()to the bottom of the first dependent module — which I’m not going to get into. It doesn’t look elegant, and it doesn’t work with some versions of Webpack; during the bundling process all therequire()declarations might automatically move to the top of the module which will force-cause the issue again. - Having a third module which will export the dependent modules and will be used at the next event loop — some might find this an antipattern, but I like it because we don’t have to switch to CommonJS, and it’s highly compatible with Webpack’s strategy.
The following code snippet demonstrates the second preferred way of solving recursive dependency conflict:
export const exports = {}
export default { exports }import React from 'react'
import { exports } from './module'
class FSBranch extends React.Component {
render() {
return <exports.FSNode />
}
}
exports.FSBranch = FSBranchimport React from 'react'
import { exports } from './module'
class FSNode extends React.Component {
render() {
return <exports.FSBranch />
}
}
exports.FSNode = FSNodeStyle
There are two methods to implement the staircase effect:
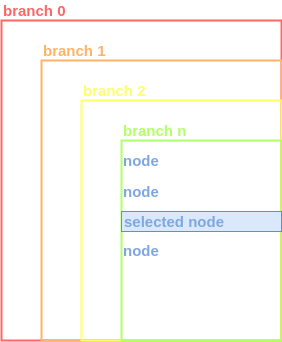
- Using a floating tree — where each branch has a constant left-margin and completely floats.
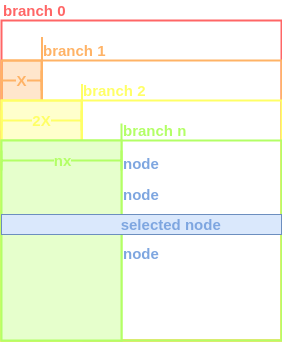
- Using a padded tree — where each branch doesn’t move further away but has an incremental padding.
A floating tree makes complete sense. It nicely vertically aligns the nodes within it based on the deepness level we’re currently at. The deeper we go the further away we’ll get from the left edge, which will result in this nice staircase effect.

However, as you can see in the illustrated tree, when selecting a node it will not be fully stretched to the left, as it completely floats with the branch. The solutions for that would be a padded tree.
Unlike the floating tree, each branch in the padded tree would fully stretch to the left, and the deeper we go the more we’re going to increase the pad between the current branch and the left edge. This way the nodes will still be vertically aligned like a staircase, but now when we select them, the highlight would appear all across the container. It’s less intuitive and slightly harder to implement, but it does the job.

Programmatically speaking, this would require us to pass a counter that will indicate how deep the current branch is (n), and multiply it by a constant value for each of its nodes (x) (See implementation).
Event Handling
One of the things that I was looking to have in my tree was an easy way to update it, for example, if one node was selected, deselected the previous one, so selection can be unique. There are many ways that this could be achieved, the most naive one would be updating one of the node’s data and then resetting the state of the tree from its root.
There’s nothing necessarily bad with that solution, and it’s actually a great pattern, however, if not implemented or used correctly, this can cause the entire DOM tree to be re-rendered, which is completely unnecessary. Instead, why not just use the node’s component as a controller?
You heard me right. Directly grabbing the reference from the React.Component’s callback and use the methods on its prototype. Sounds tricky, but it works fast and efficiently (see implementation).
function onSelect(node) {
  // A React.Component is used directly as a controller
  assert(node instanceof React.Component)
  assert(node instanceof FSNode)

  if (this.state.selectedNode) {
    this.state.selectedNode.deselect()
  }

  this.setState({
    selectedNode: node
  })
}

function onDeselect() {
  this.setState({
    selectedNode: null
  })
}
One thing to note is that since the controllers are hard-wired to the view, hypothetically speaking
we wouldn’t be able to have any controllers for child nodes of a node that is not revealed
(node.opened === false). I’ve managed to bypass this issue by using the React.Component’s
constructor directly. This is perfectly legal and no error is thrown, unless used irresponsibly to
render something, which completely doesn’t make sense (new FSNode(props); see
implementation).
Final Words
A program can be written in many ways. I know that my way of implementing a tree view can be very distinct, but since all trees should be based around recursion, you can take a lot from what I’ve learnt.
Below is the final result of the tree that I’ve created. Feel free to visit its GitHub page or grab a copy using NPM.

Join our newsletter
Want to hear from us when there's something new?
Sign up and stay up to date!
*By subscribing, you agree with Beehiiv’s Terms of Service and Privacy Policy.