Single Sign On via OIDC (Open ID Connect Provider)
Hive allows you to connect any Open ID Connect provider (e.g. Okta, Auth0, Azure AD, or Google Workspaces) to your organization. This allows you to use then existing Open ID Connect provider to authenticate and automatically add your users to your organization.
Users signing into your organization will be automatically added to your organization and will be able to access all the resources that you have granted them access to. Users that sign using the Open ID Connect provider will only be scoped to that organization and incapable of creating organizations or joining any other organizations.
This page will guide you through the process of connecting your Open ID Connect provider to your Hive organization.
SSO is a core feature in Hive, and available for all subscriptions and plans, including free plans. We do not gate any features behind a paywall.
Setup Instructions
Connecting the OIDC Provider
Your OIDC provider needs to support the email claim capability in order to
work correctly with Hive SSO.
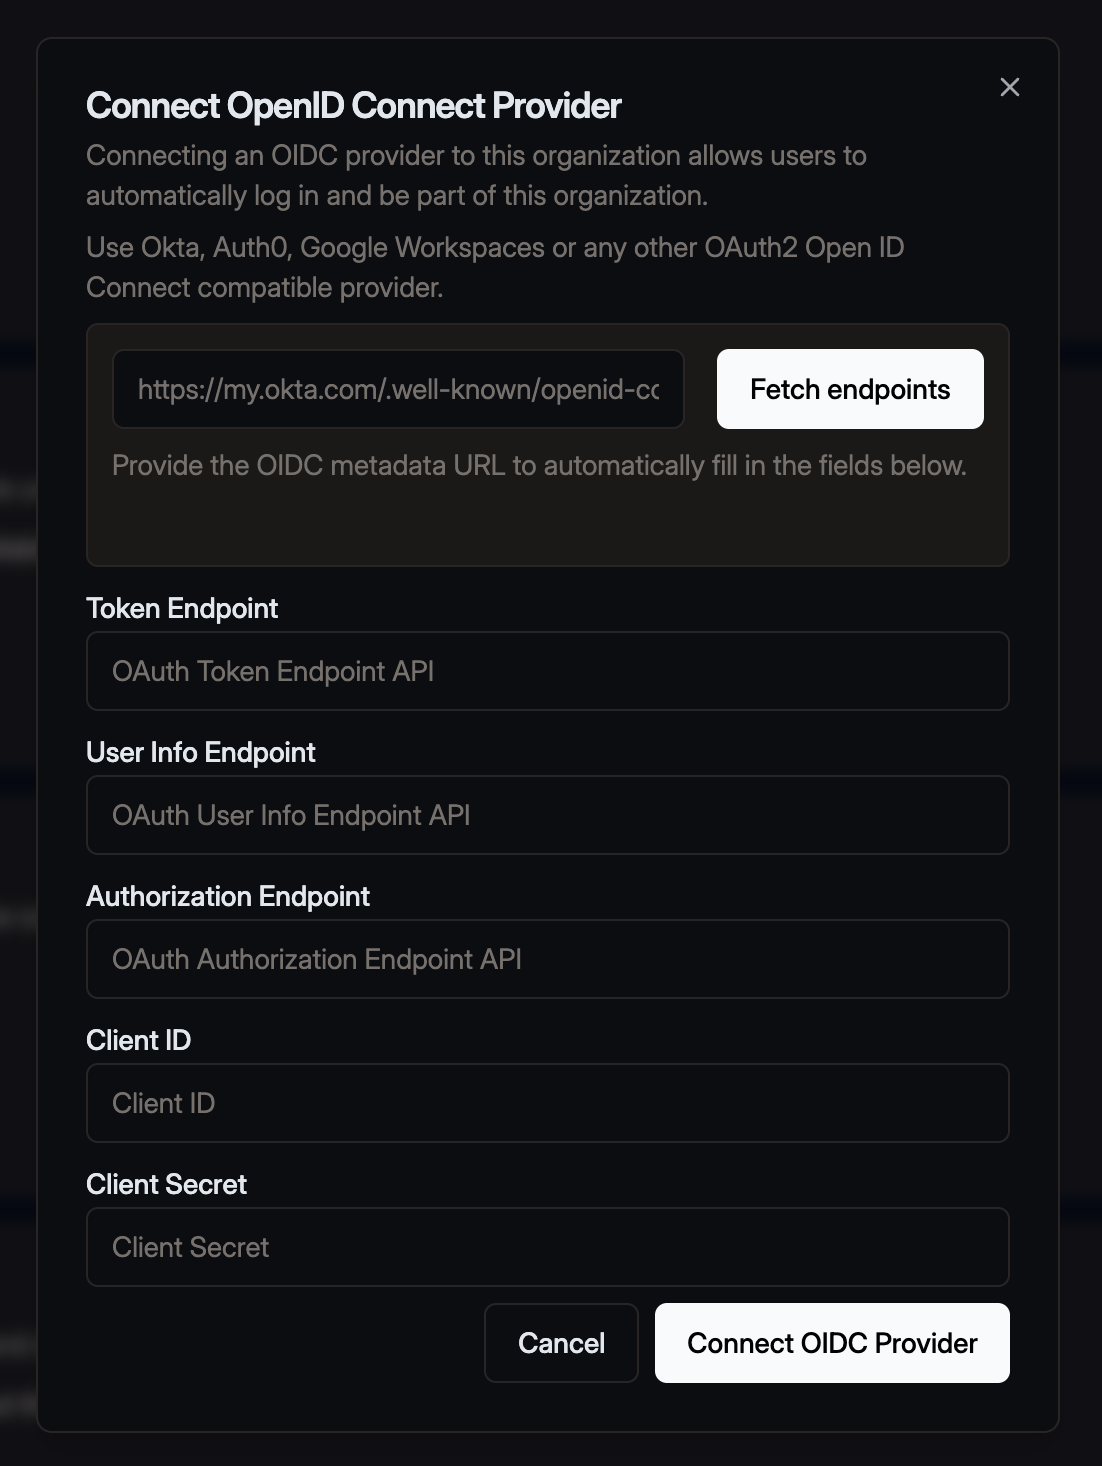
Visit your organization Settings page and click on the Connect Open ID Connect Provider button.
For the form, fill in the following information:
- OAuth API URL: The OAuth API url of your OIDC provider. This is the url that you use to sign
into your OIDC provider. For example
https://trial-xxxxxx.okta.com/oauth2/v1if you are using Okta as your OIDC provider. - Client ID: The client id of your OIDC provider.
- Client Secret: The client secret of your OIDC provider.
Connect the provider by clicking on the Connect OIDC Provider button.
Configuring your OIDC Provider
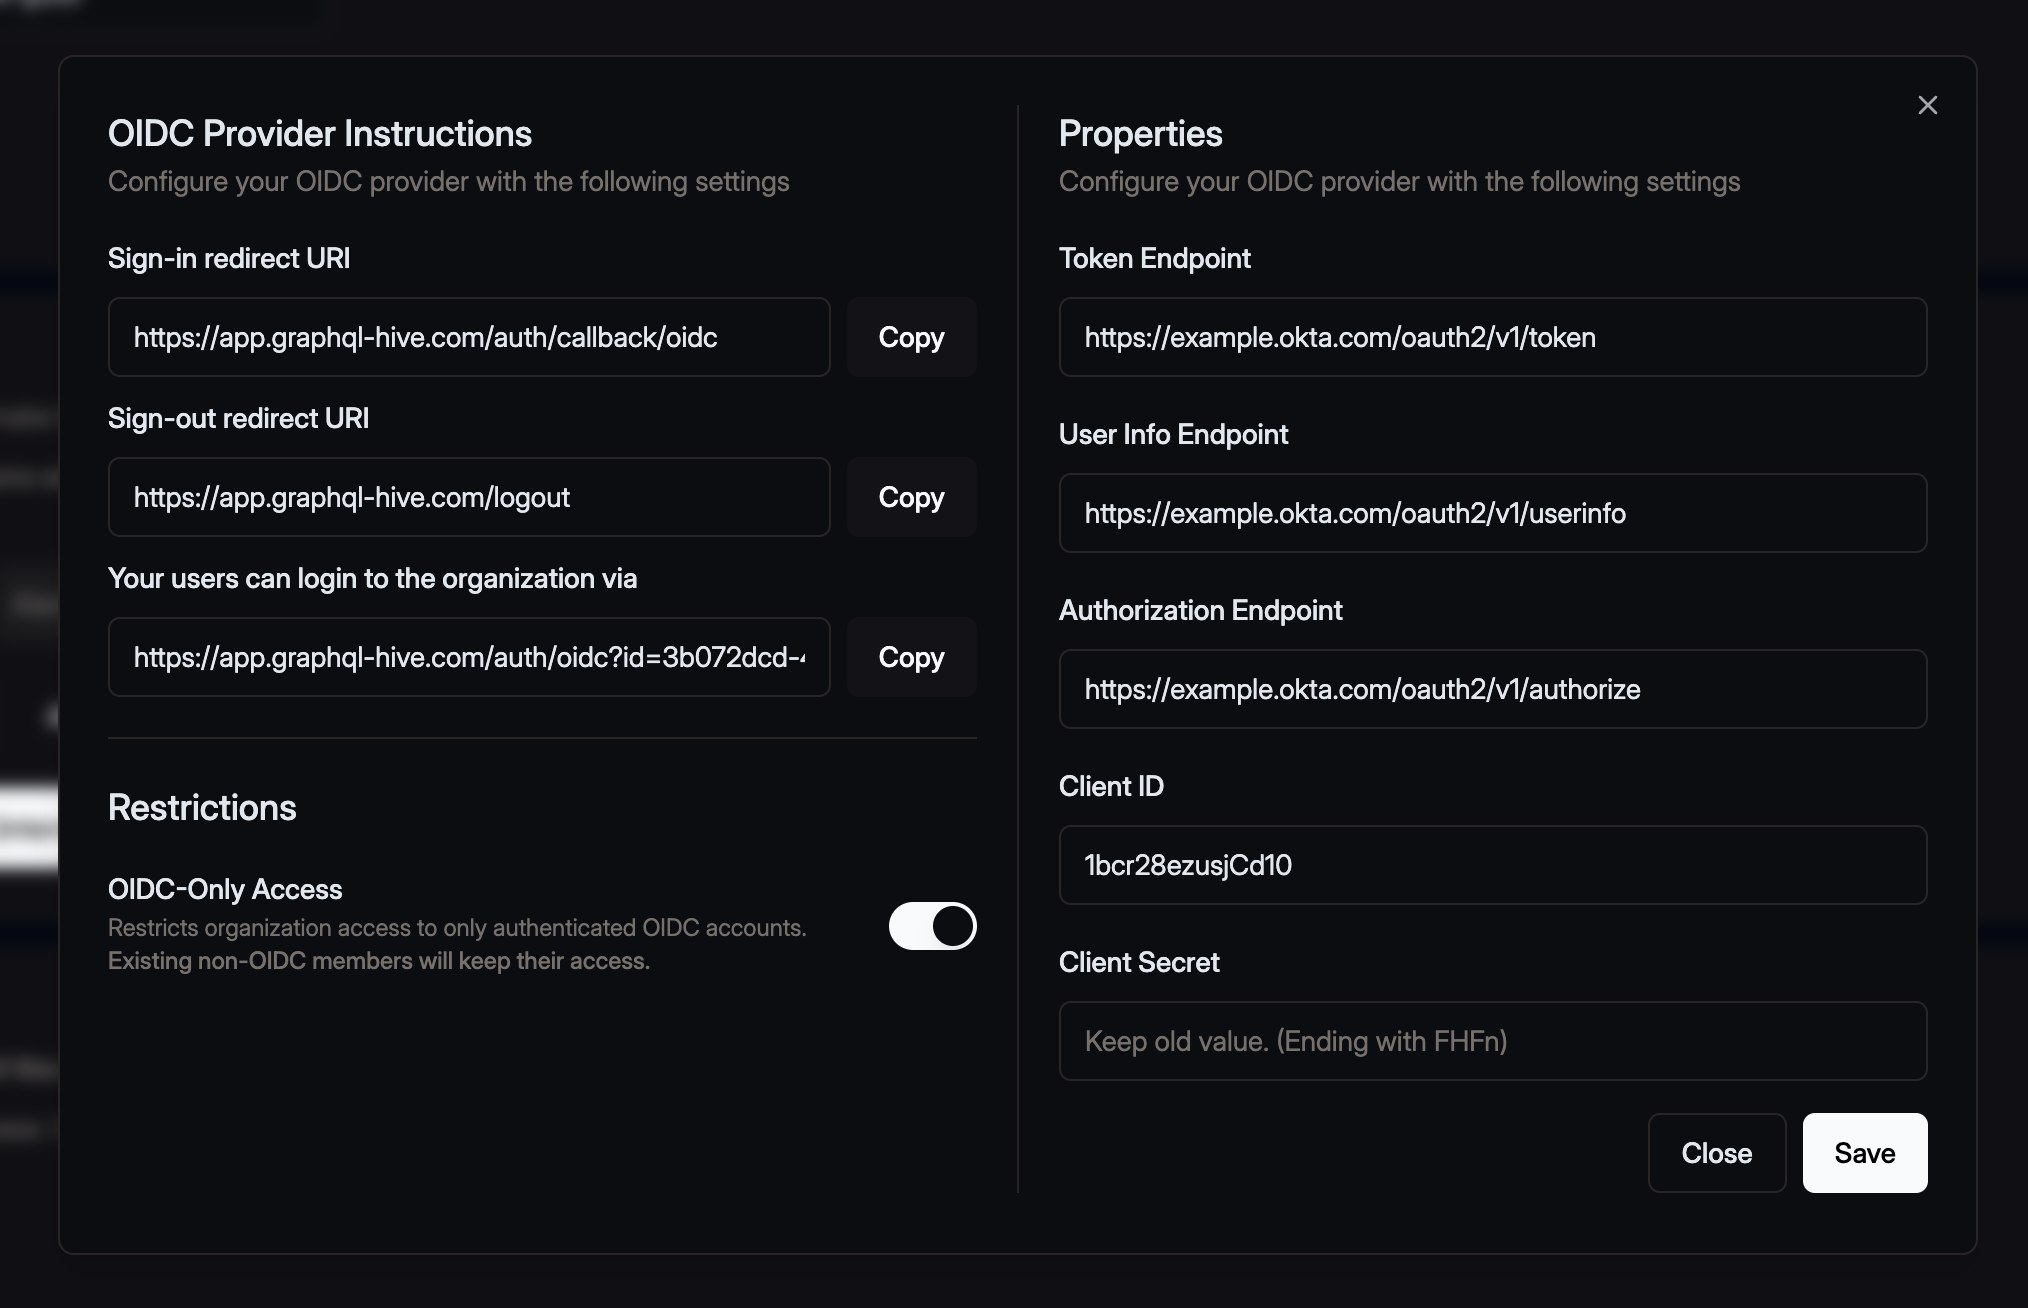
After creating the OIDC Provider the Manage OpenID Connect Integration modal will opened. Alternatively you can click the Manage OIDC Provider button on your organization Settings page.
This page will show the OIDC Provider Sign-in redirect URI (e.g.
https://app.graphql-hive.com/auth/callback/oidc) and the OIDC Provider Sign-out redirect URI
(e.g. https://app.graphql-hive.com/logout).
Go to the dashboard of your OIDC provider and set these values as the Sign-in redirect URI and Sign-out redirect URI respectively.
Login via OIDC
After creating the OIDC Provider the Manage OpenID Connect Integration modal will opened. Alternatively you can click the Manage OIDC Provider button on your organization Settings page.
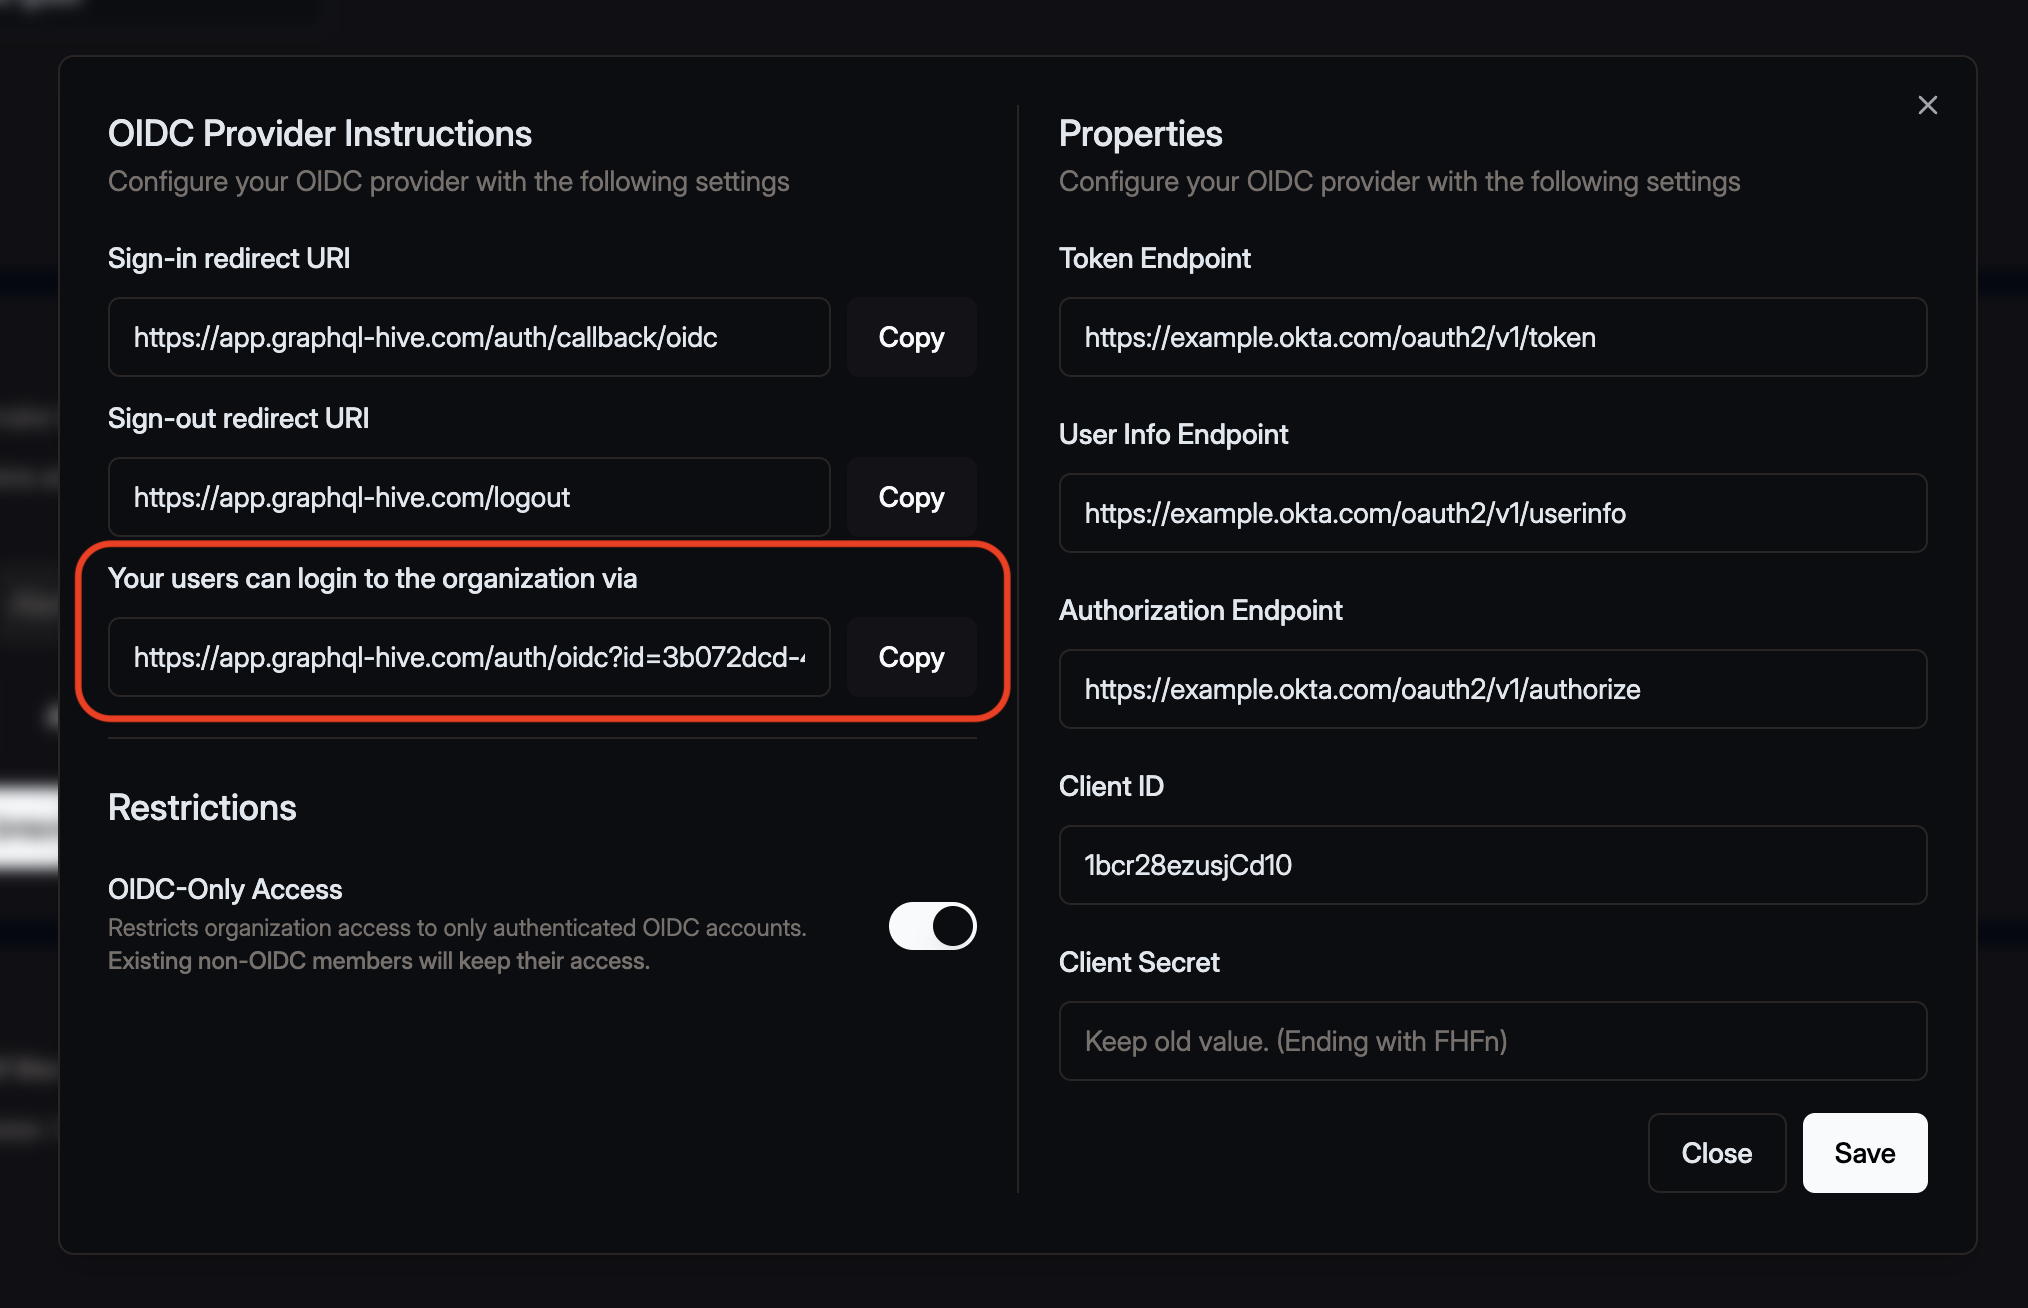
That page shows the login URL that your users can utilize for logging in via the OIDC Provider. Share this link with your users or add it to your SSO provider dashboard, so people will be redirected to it.
Your login URL will look like this:
https://app.graphql-hive.com/auth/oidc?id=xxxxxxxx-1234-1234-1234-xxxxxxxxxxxxYou can also sign in by clicking the "Login with SSO" button on the login screen. Simply enter your organization's slug, and you will then be redirected to your OIDC provider.
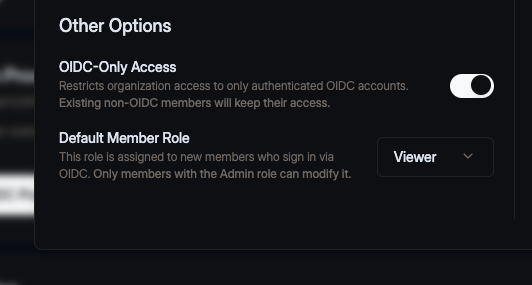
Access to the organization is restricted to the OIDC accounts by default. If you want to allow users to sign in with email and password, or any other auth provider, visit your organization Settings page and in the OpenID Connect configuration disable the OIDC-Only Access option.
Default Role for OIDC Users
When a new member signs in via OIDC, they'll now be automatically assigned the default role
configured by your organization. The role is set to system Viewer by default, but you can change
it in the OIDC configuration to any role you've created
(How to create a new role).
In addition, you can also select the resources that shall be assigned to the user by default.
Integration Guides
Okta
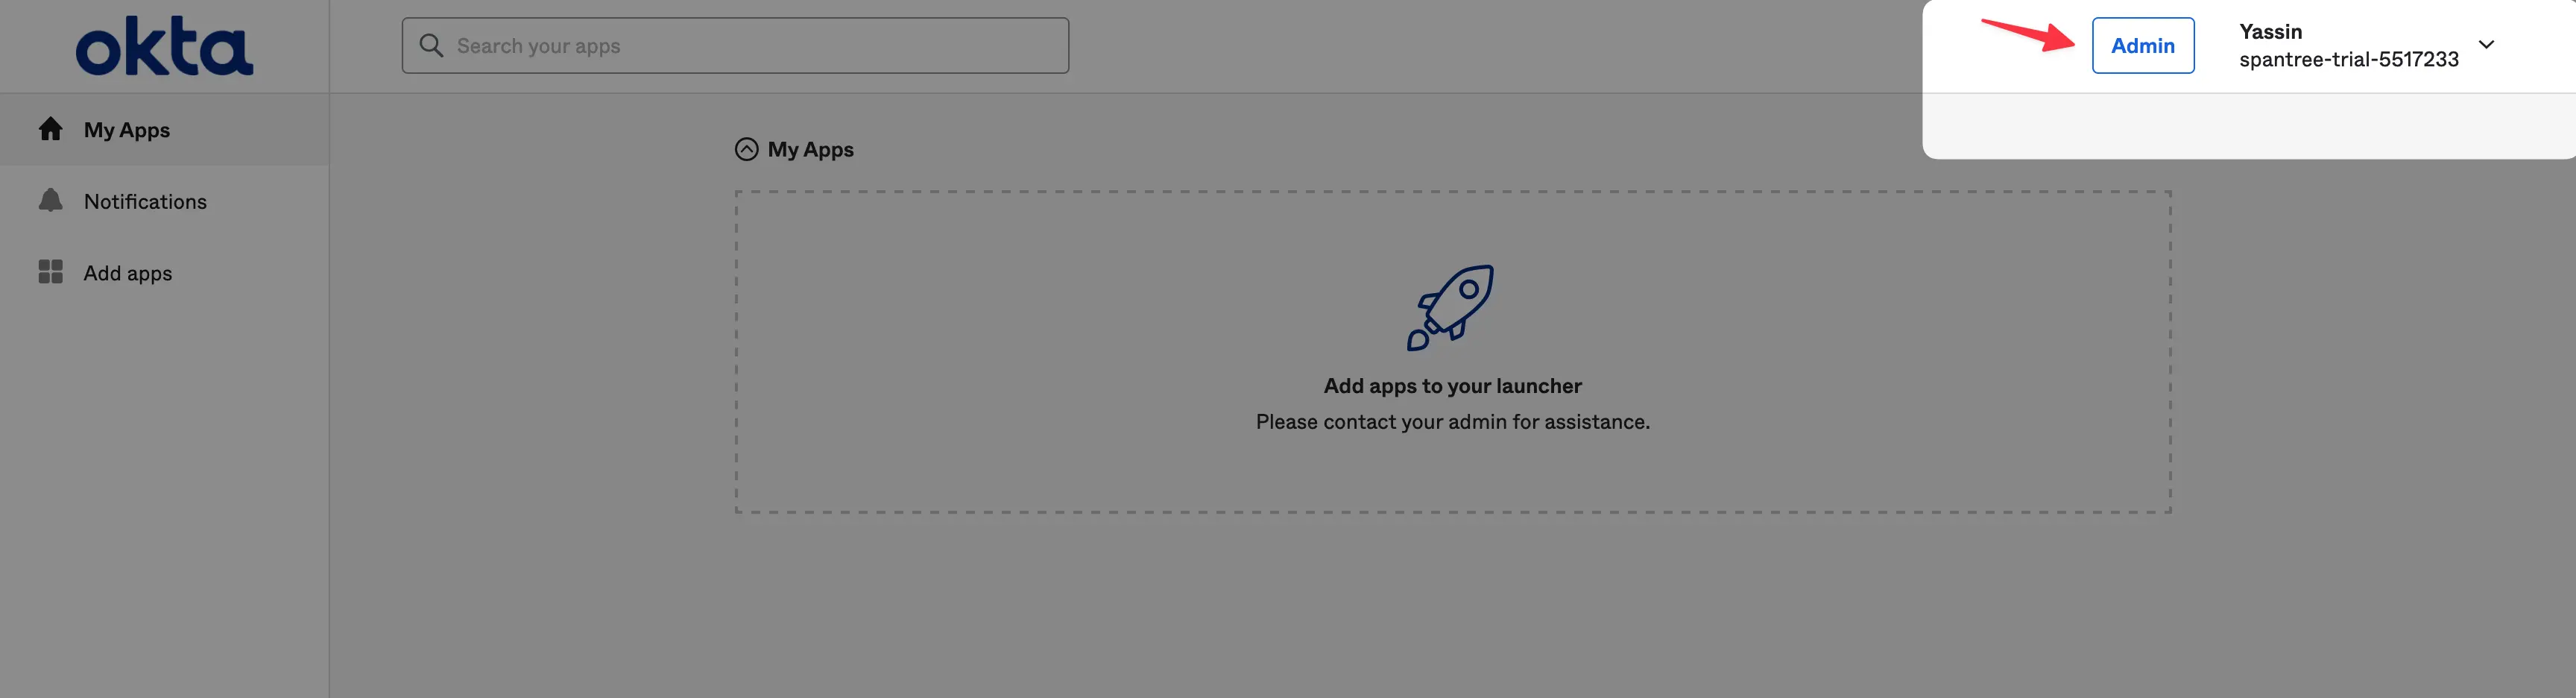
Once you're logged in to your account, click the Admin button in the header to navigate to the admin view.
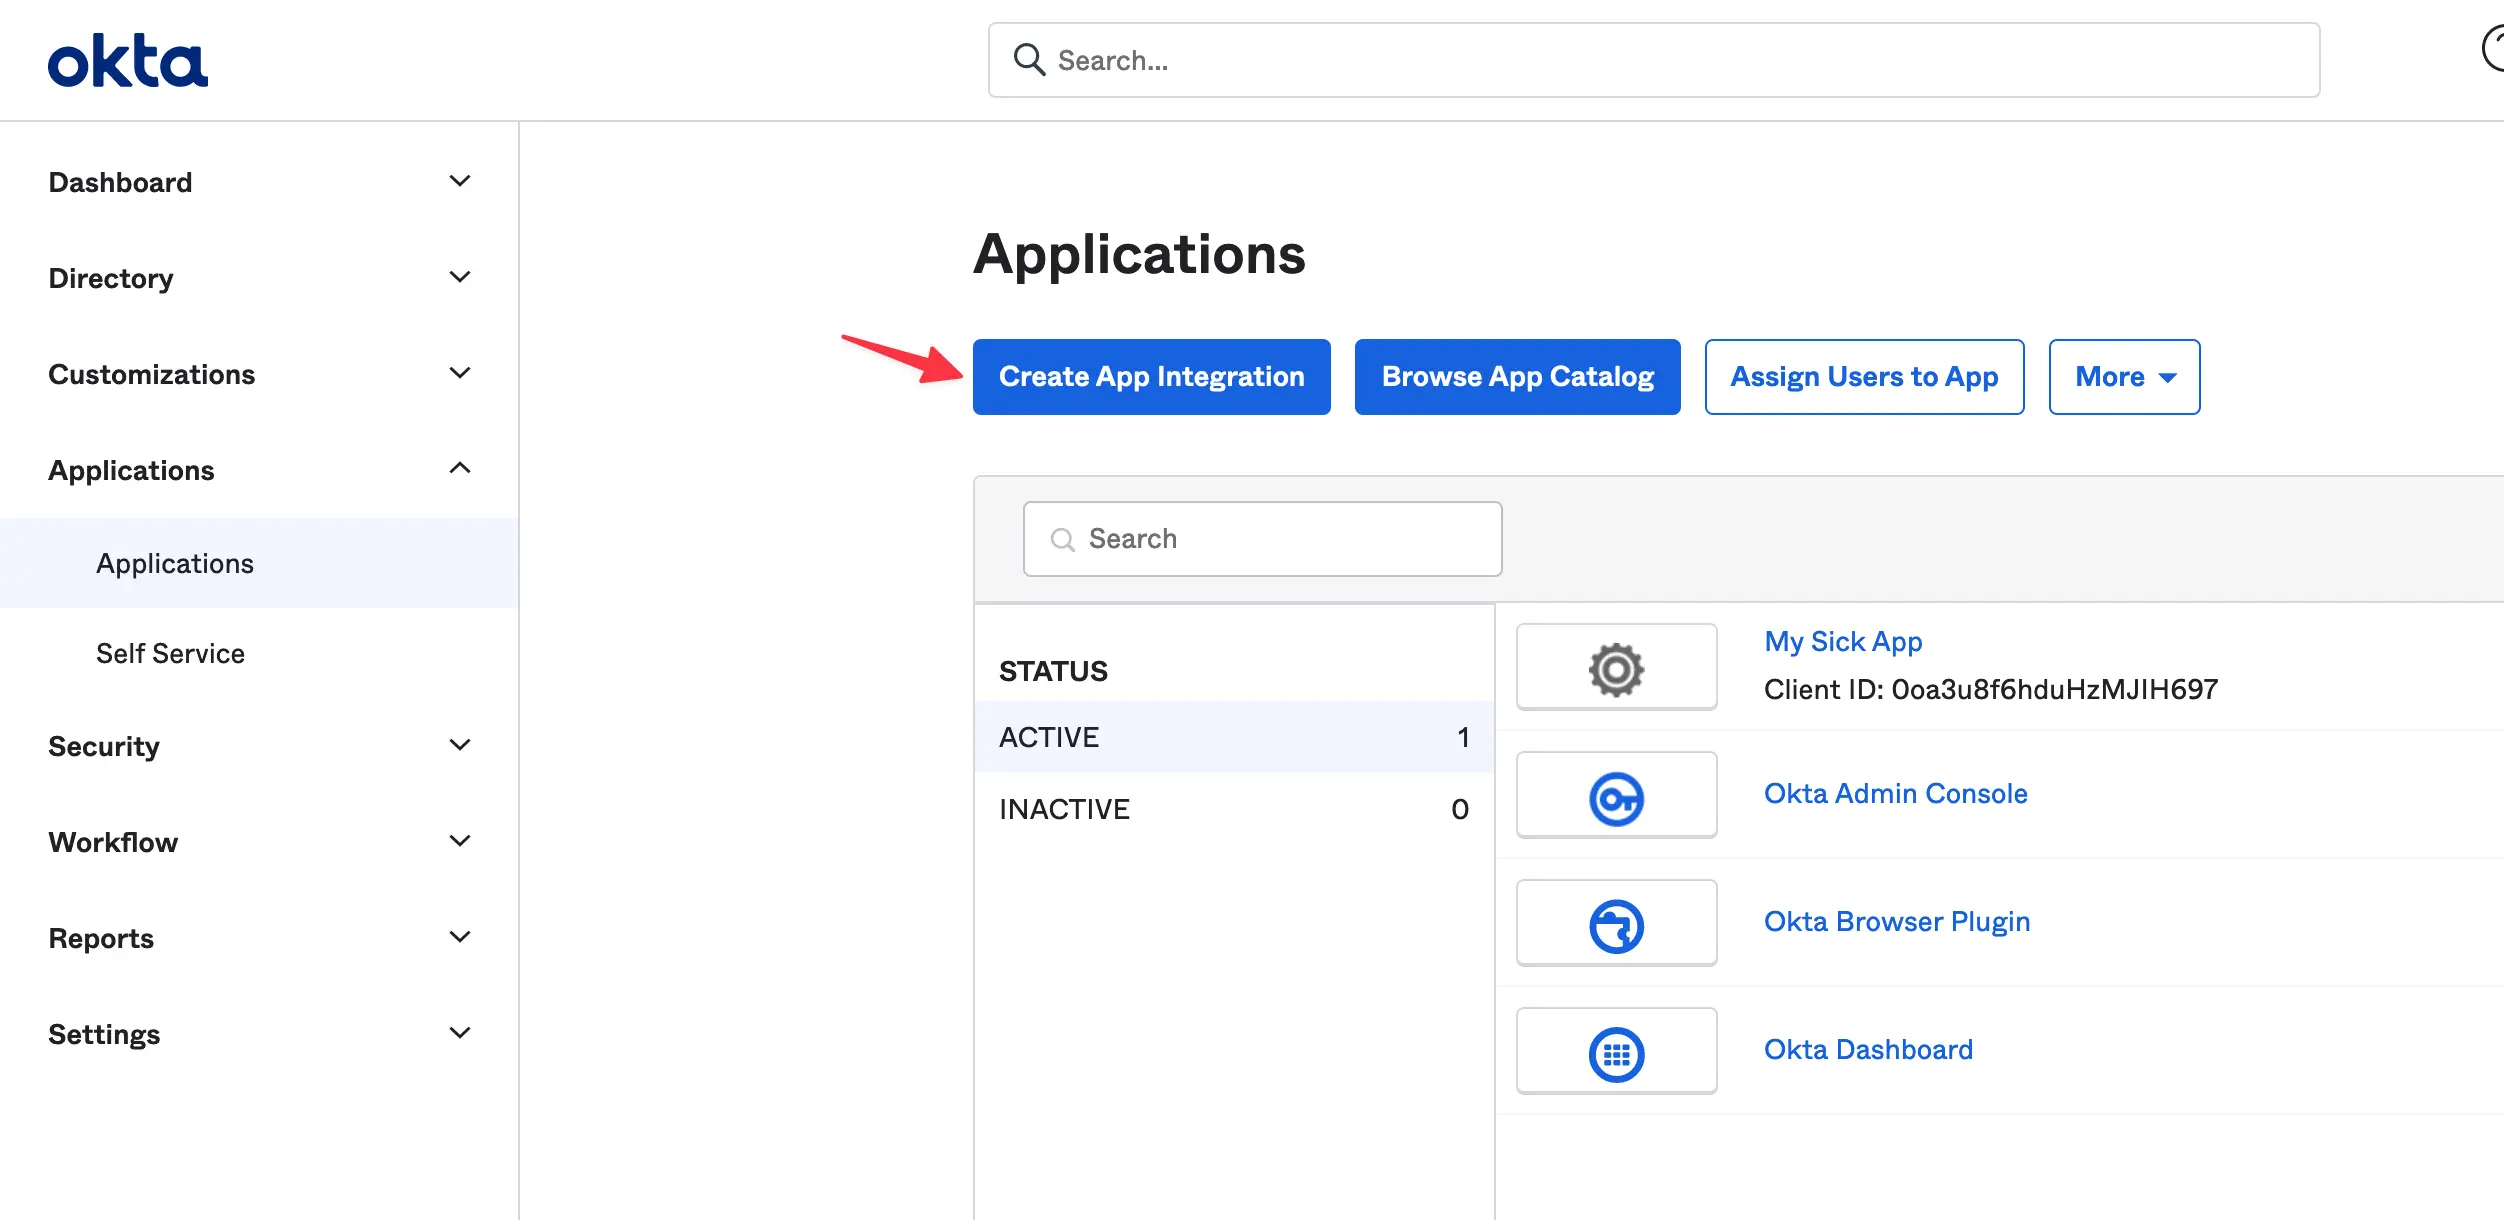
After you're redirected click on the Applications tab in the sidebar then click on the Create App Integration button:
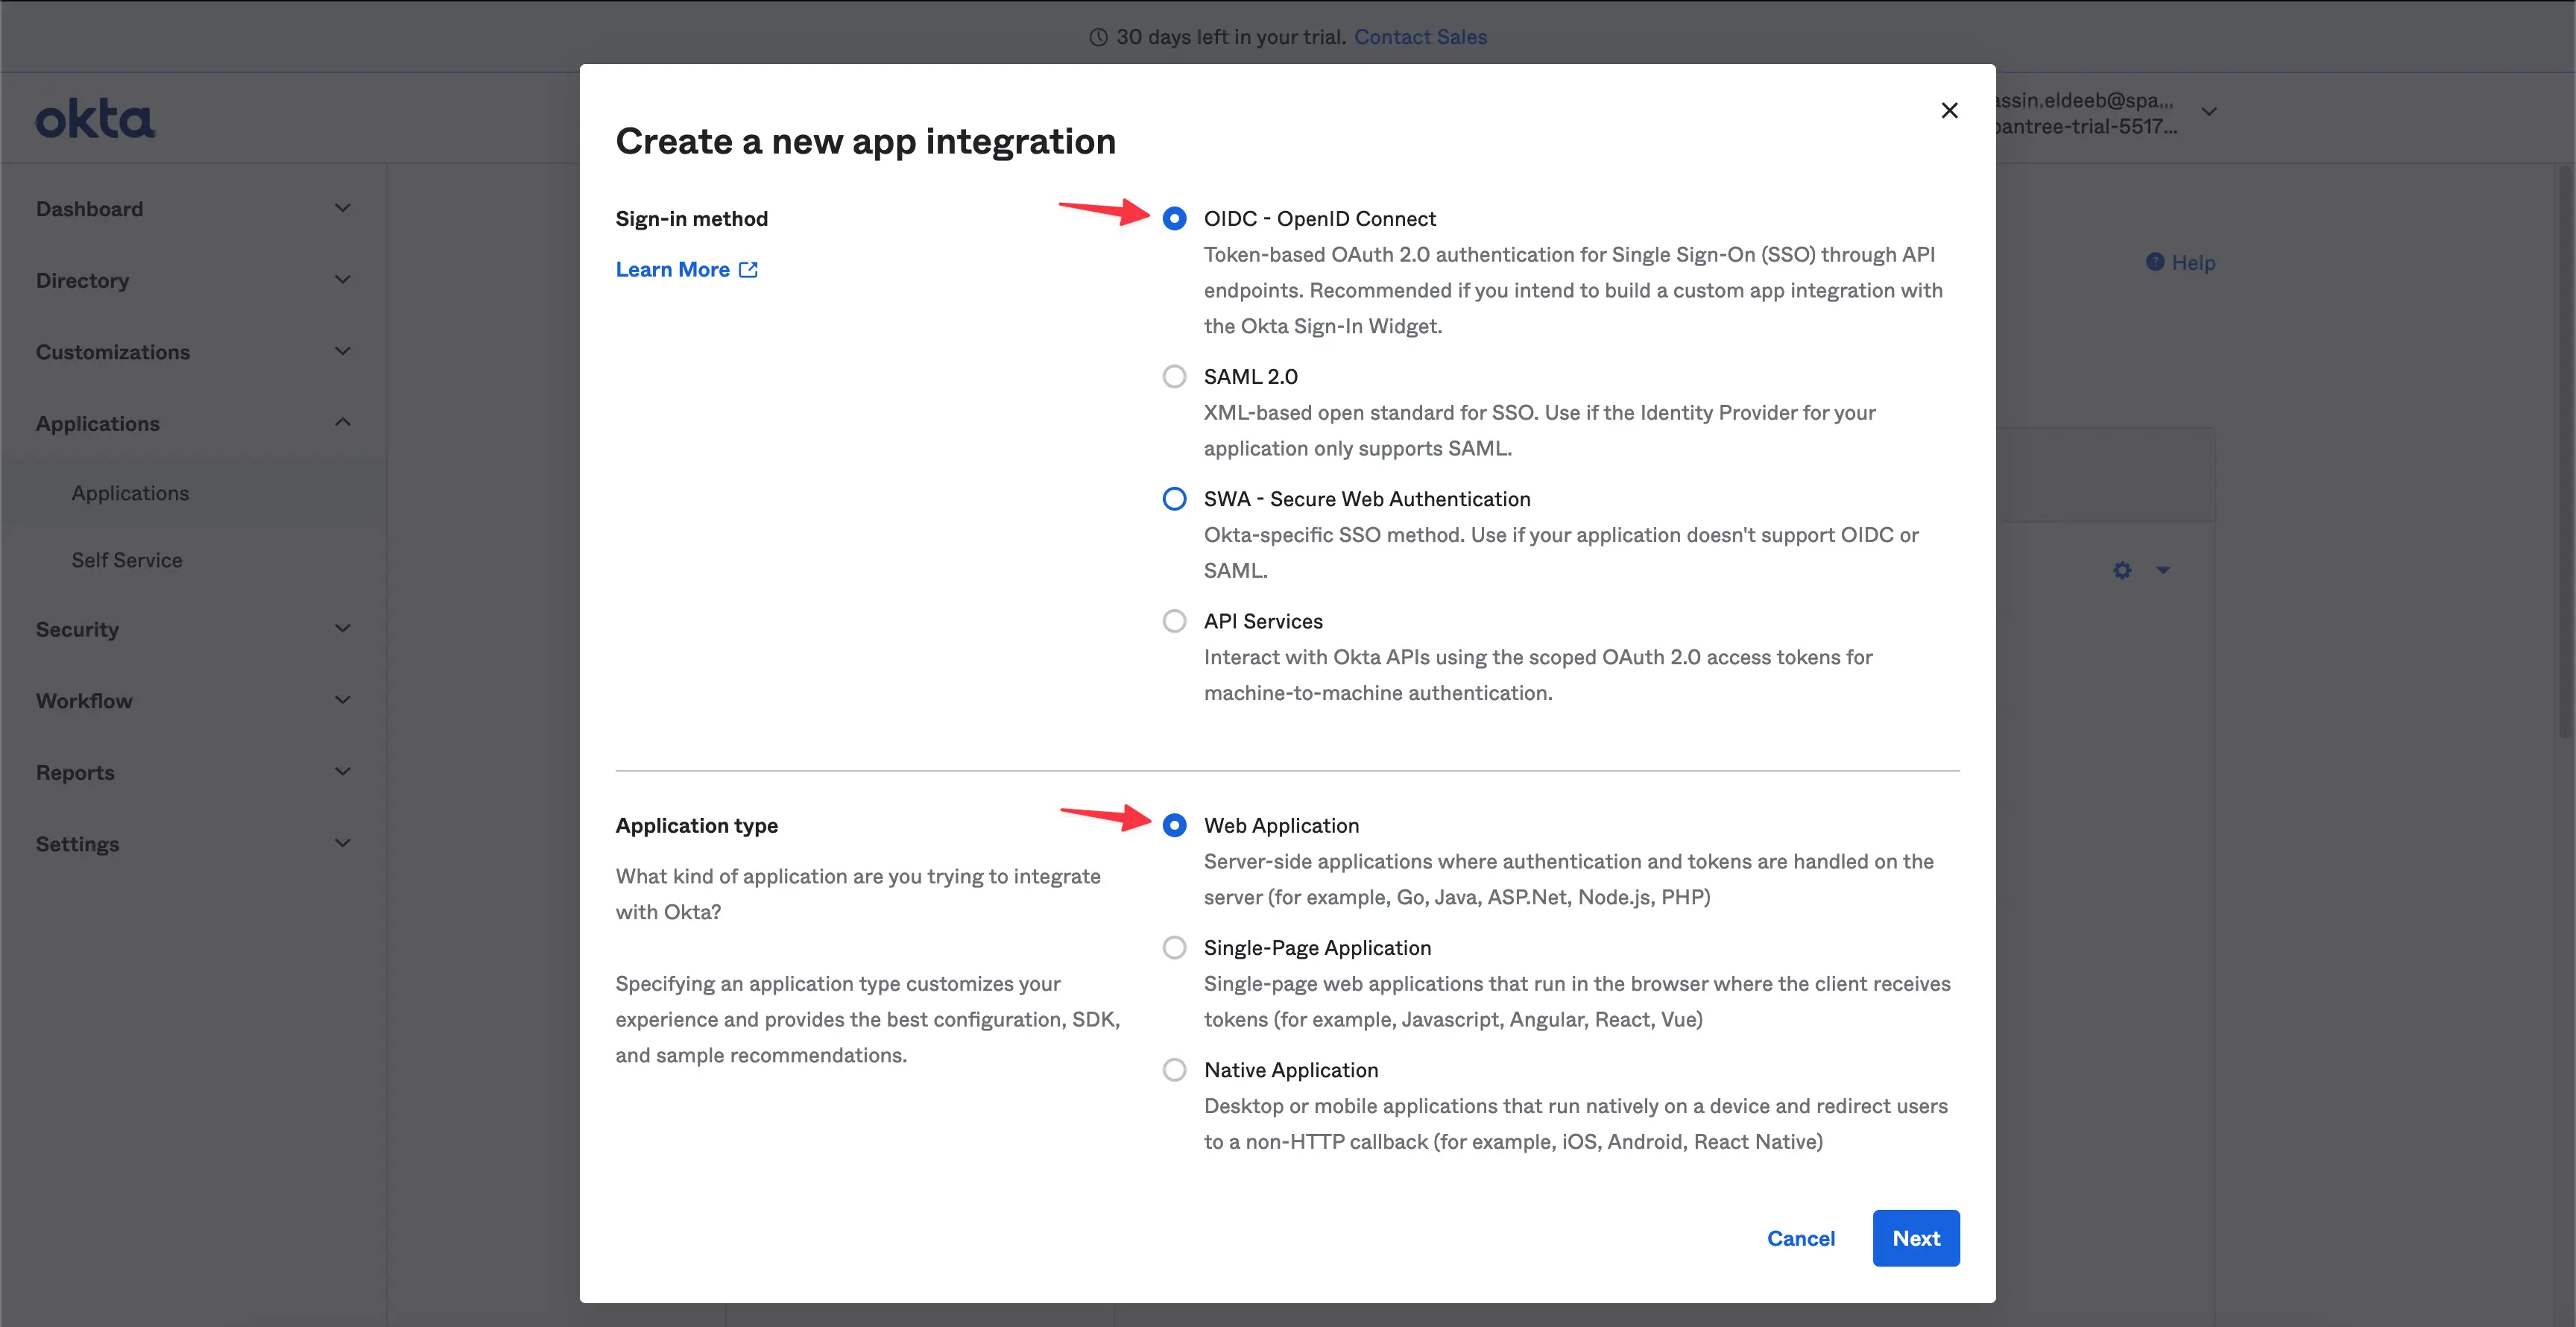
Choose OIDC - OpenID Connect as for the Sign-in method and Web Application for the Application type, then click Next.
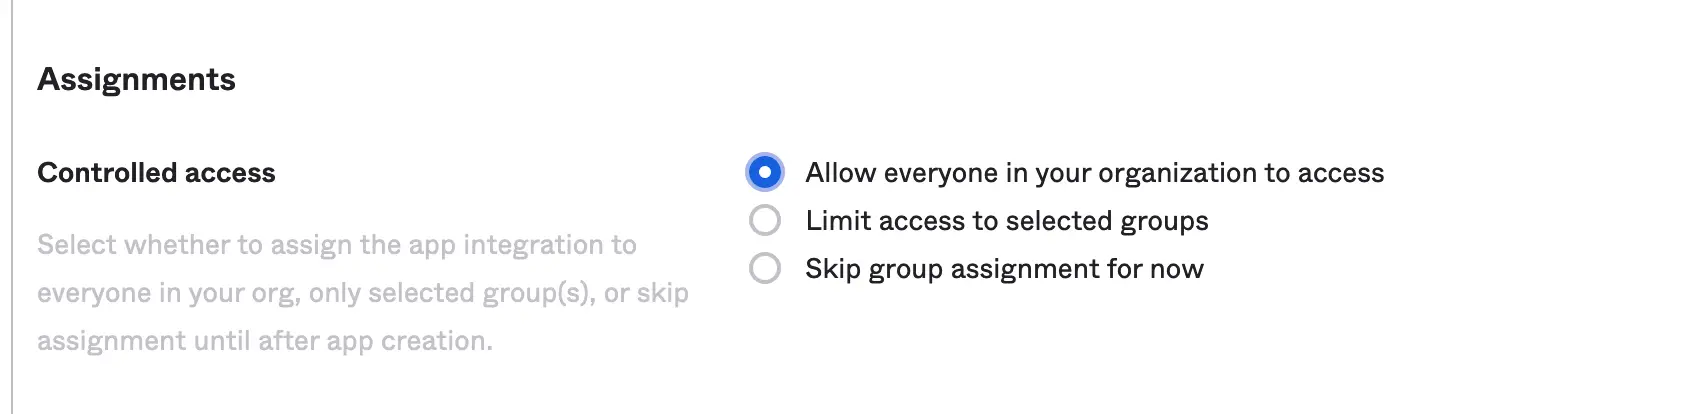
Next you're gonna be able to customize your app's name and logo if you want to, then choose the option that suits you for the "Controlled access", I'm gonna go with "Allow everyone" as this's just a guide, after you're done click "Save".
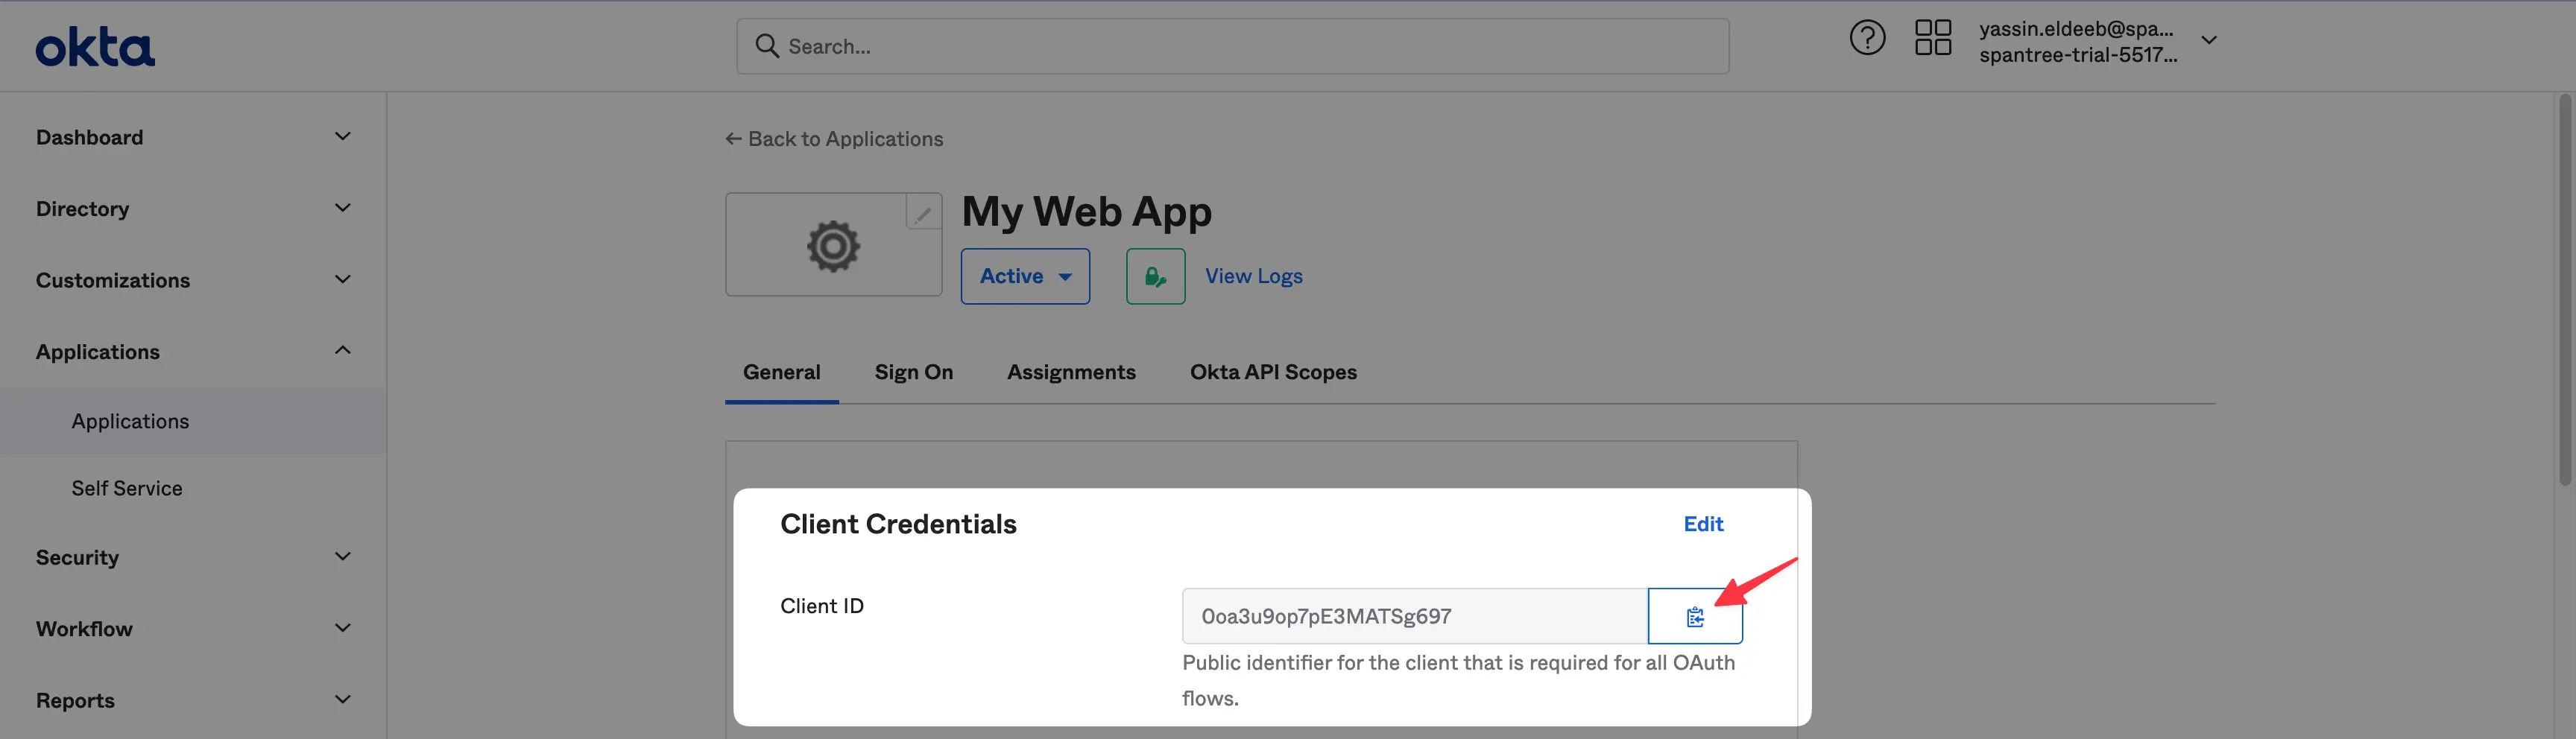
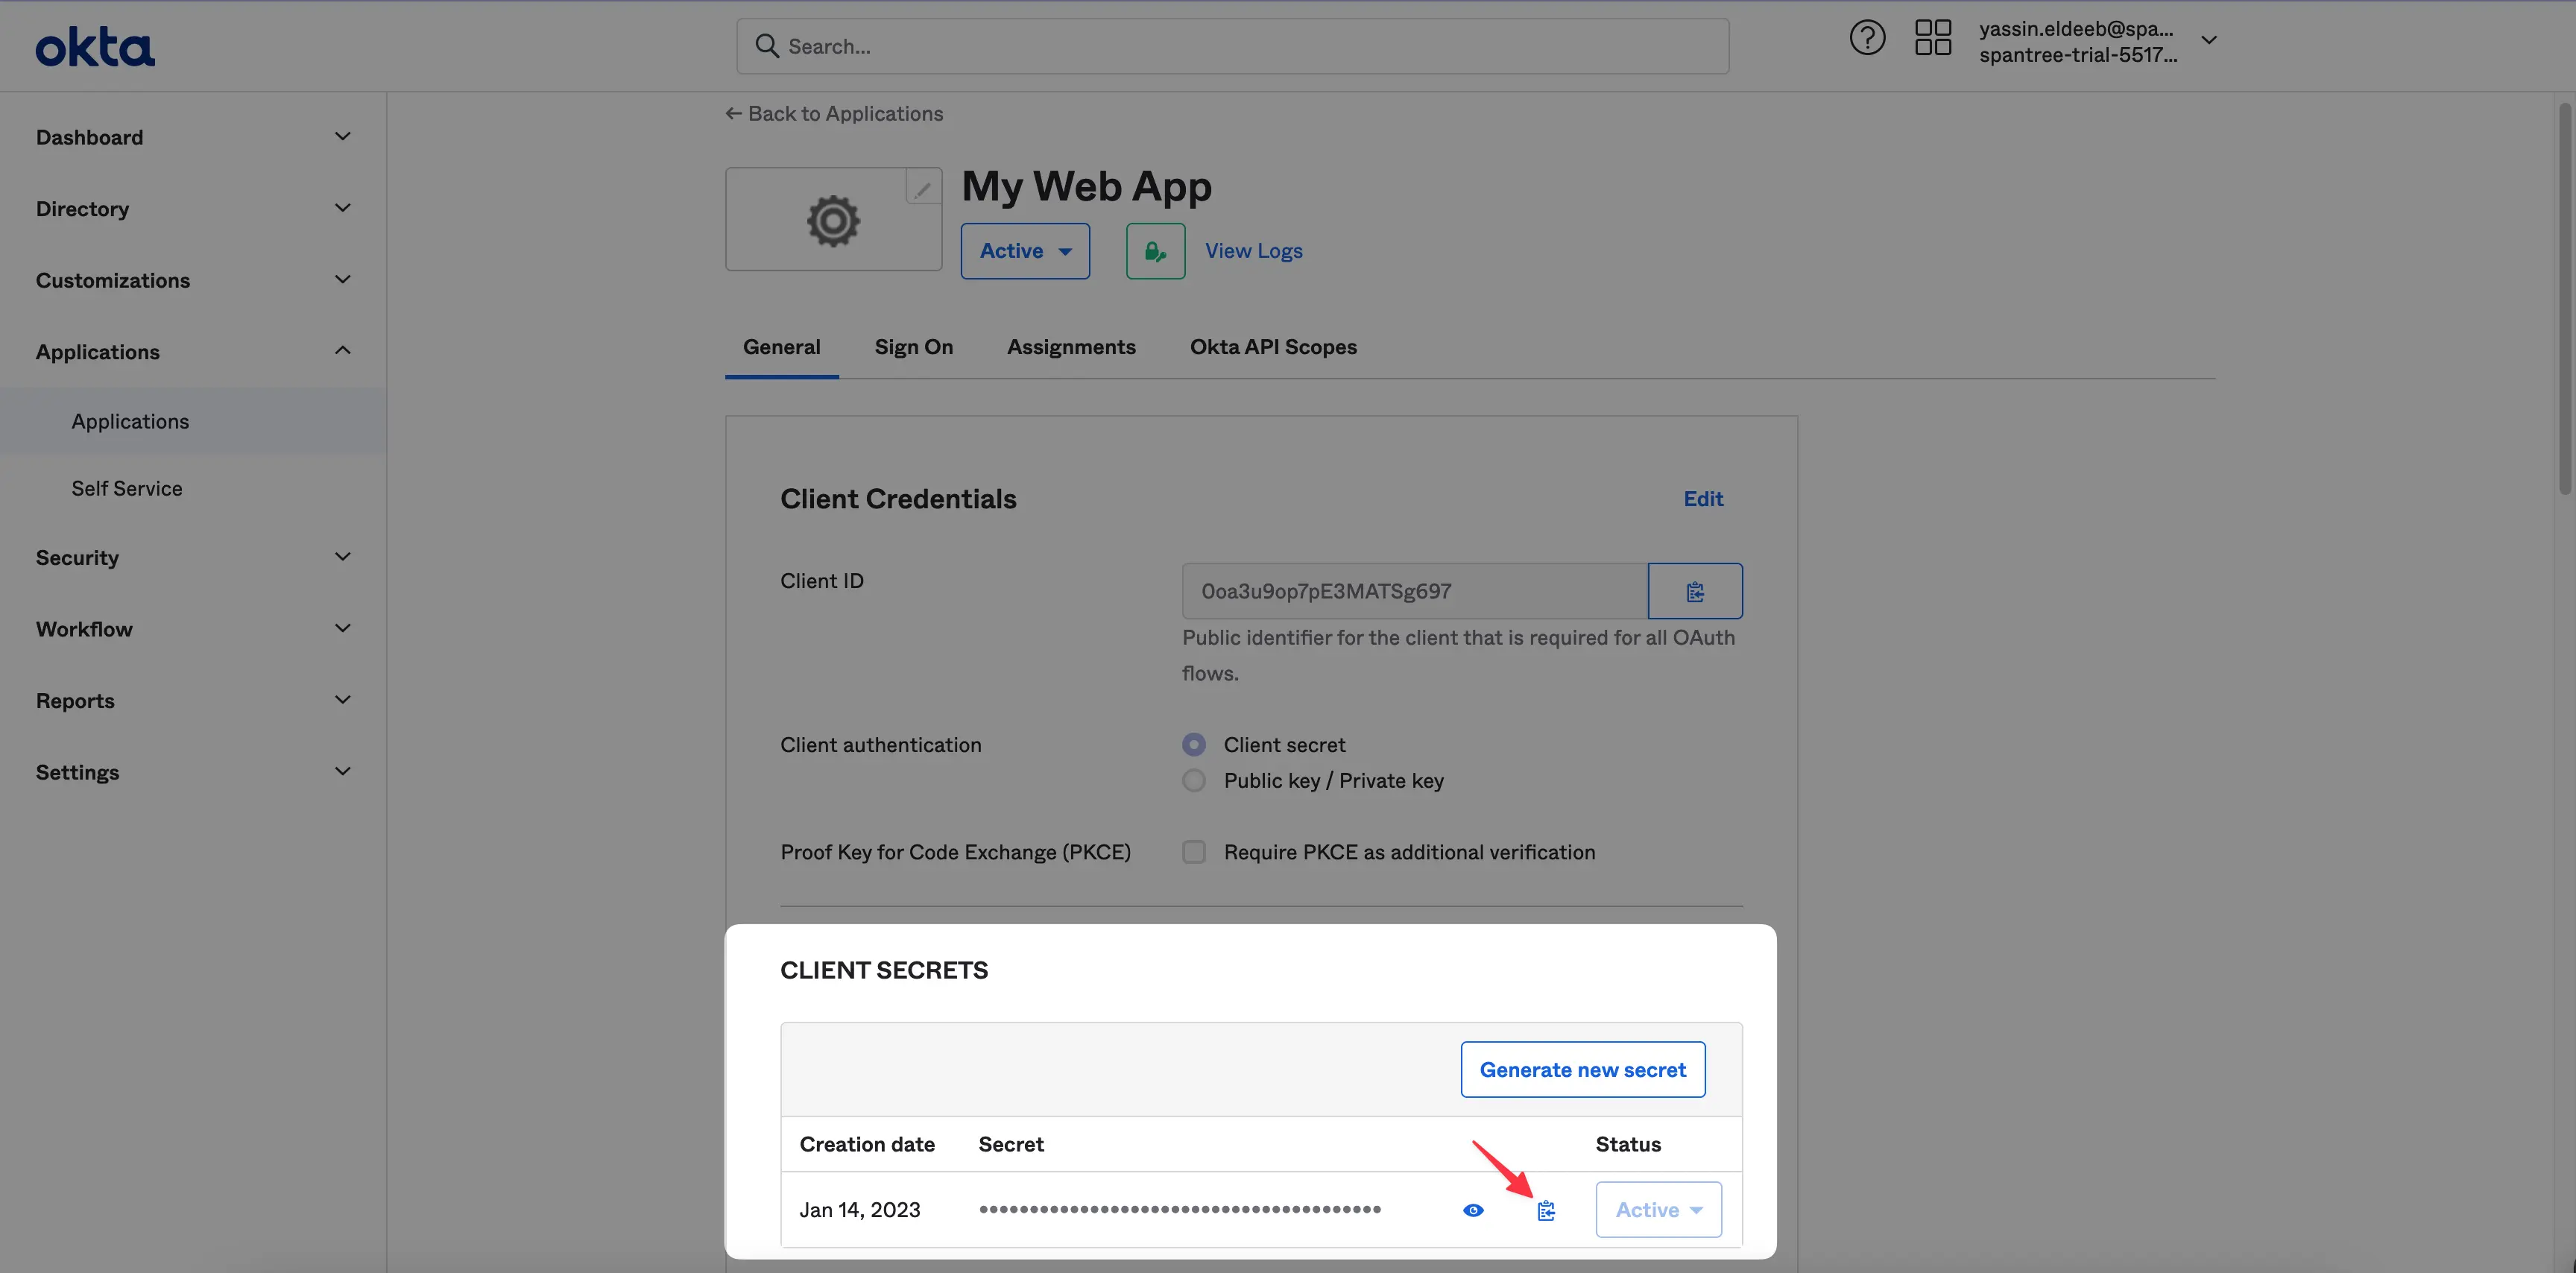
From the Okta dashboard, grab and store the Client ID and Client Secret:
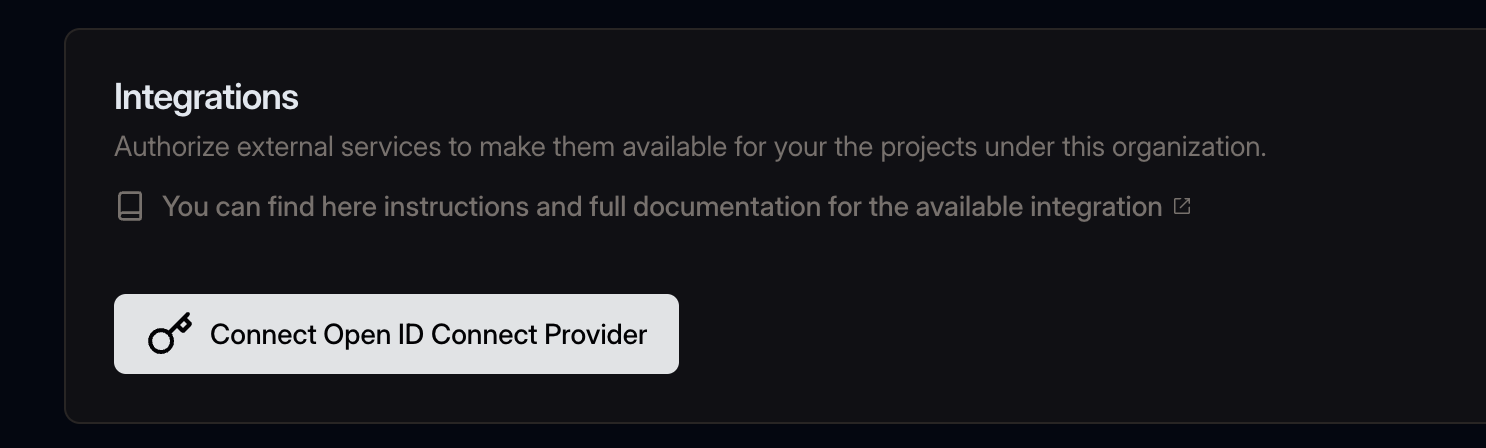
And now you're almost good to go with Okta's configuration, now head to your Hive organization settings tab and hit the Connect Open ID Connect Provider button
And now you'd have to fill in a couple of inputs to connect your OpenID Okta's provider as the following:
- Token Endpoint:
https://YOUR_OKTA_DOMAIN_HERE/oauth2/v1/token - User Info Endpoint:
https://YOUR_OKTA_DOMAIN_HERE/oauth2/v1/userinfo - Authorization Endpoint:
https://YOUR_OKTA_DOMAIN_HERE/oauth2/v1/authorize - Client ID: from Okta dashboard
- Client Secret: from Okta dashboard
After you're done, click the Connect OIDC Provider button.
The last step to do is, grabbing both the OIDC provider sign-in and sign-out redirect URIs by clicking the copy button next to them.
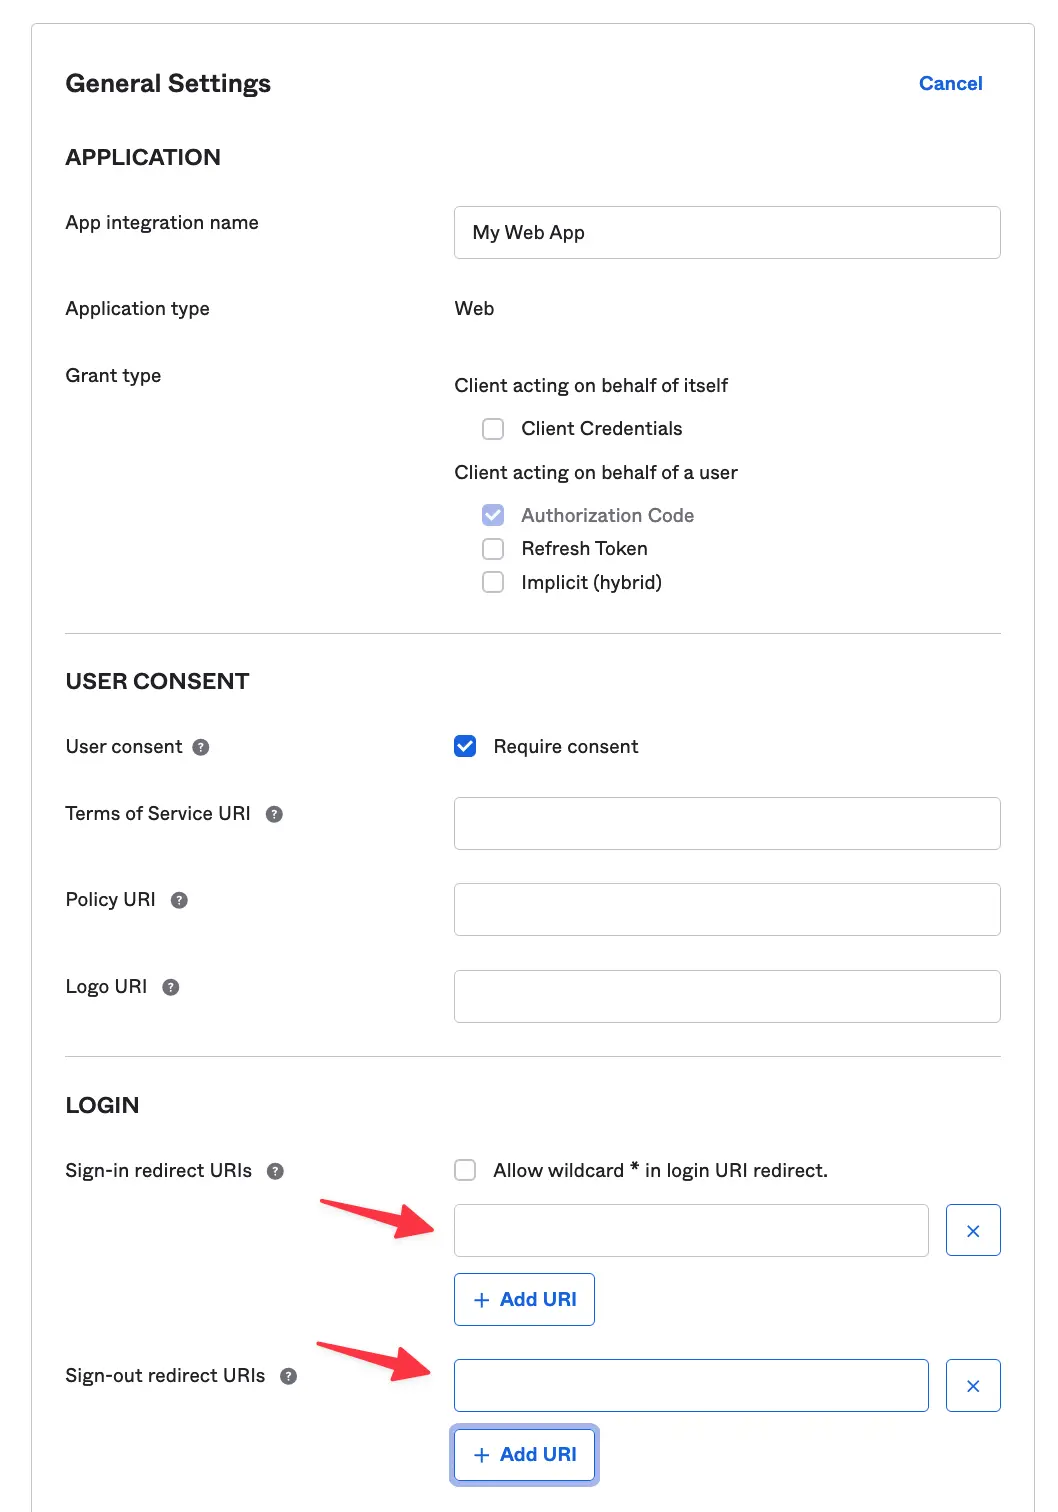
In your Okta's app SSO configuration and scroll down to the General Settings section and click Edit on the right, then scroll down to the LOGIN section and paste both the Sign-in redirect URI and the Sign-out redirect URI from Hive into their responding inputs and click Save when you're done.
And congrats, you now have Okta connected! 🥳🎉
You can use the link provided in the modal left section to let your users login via Okta.
Azure
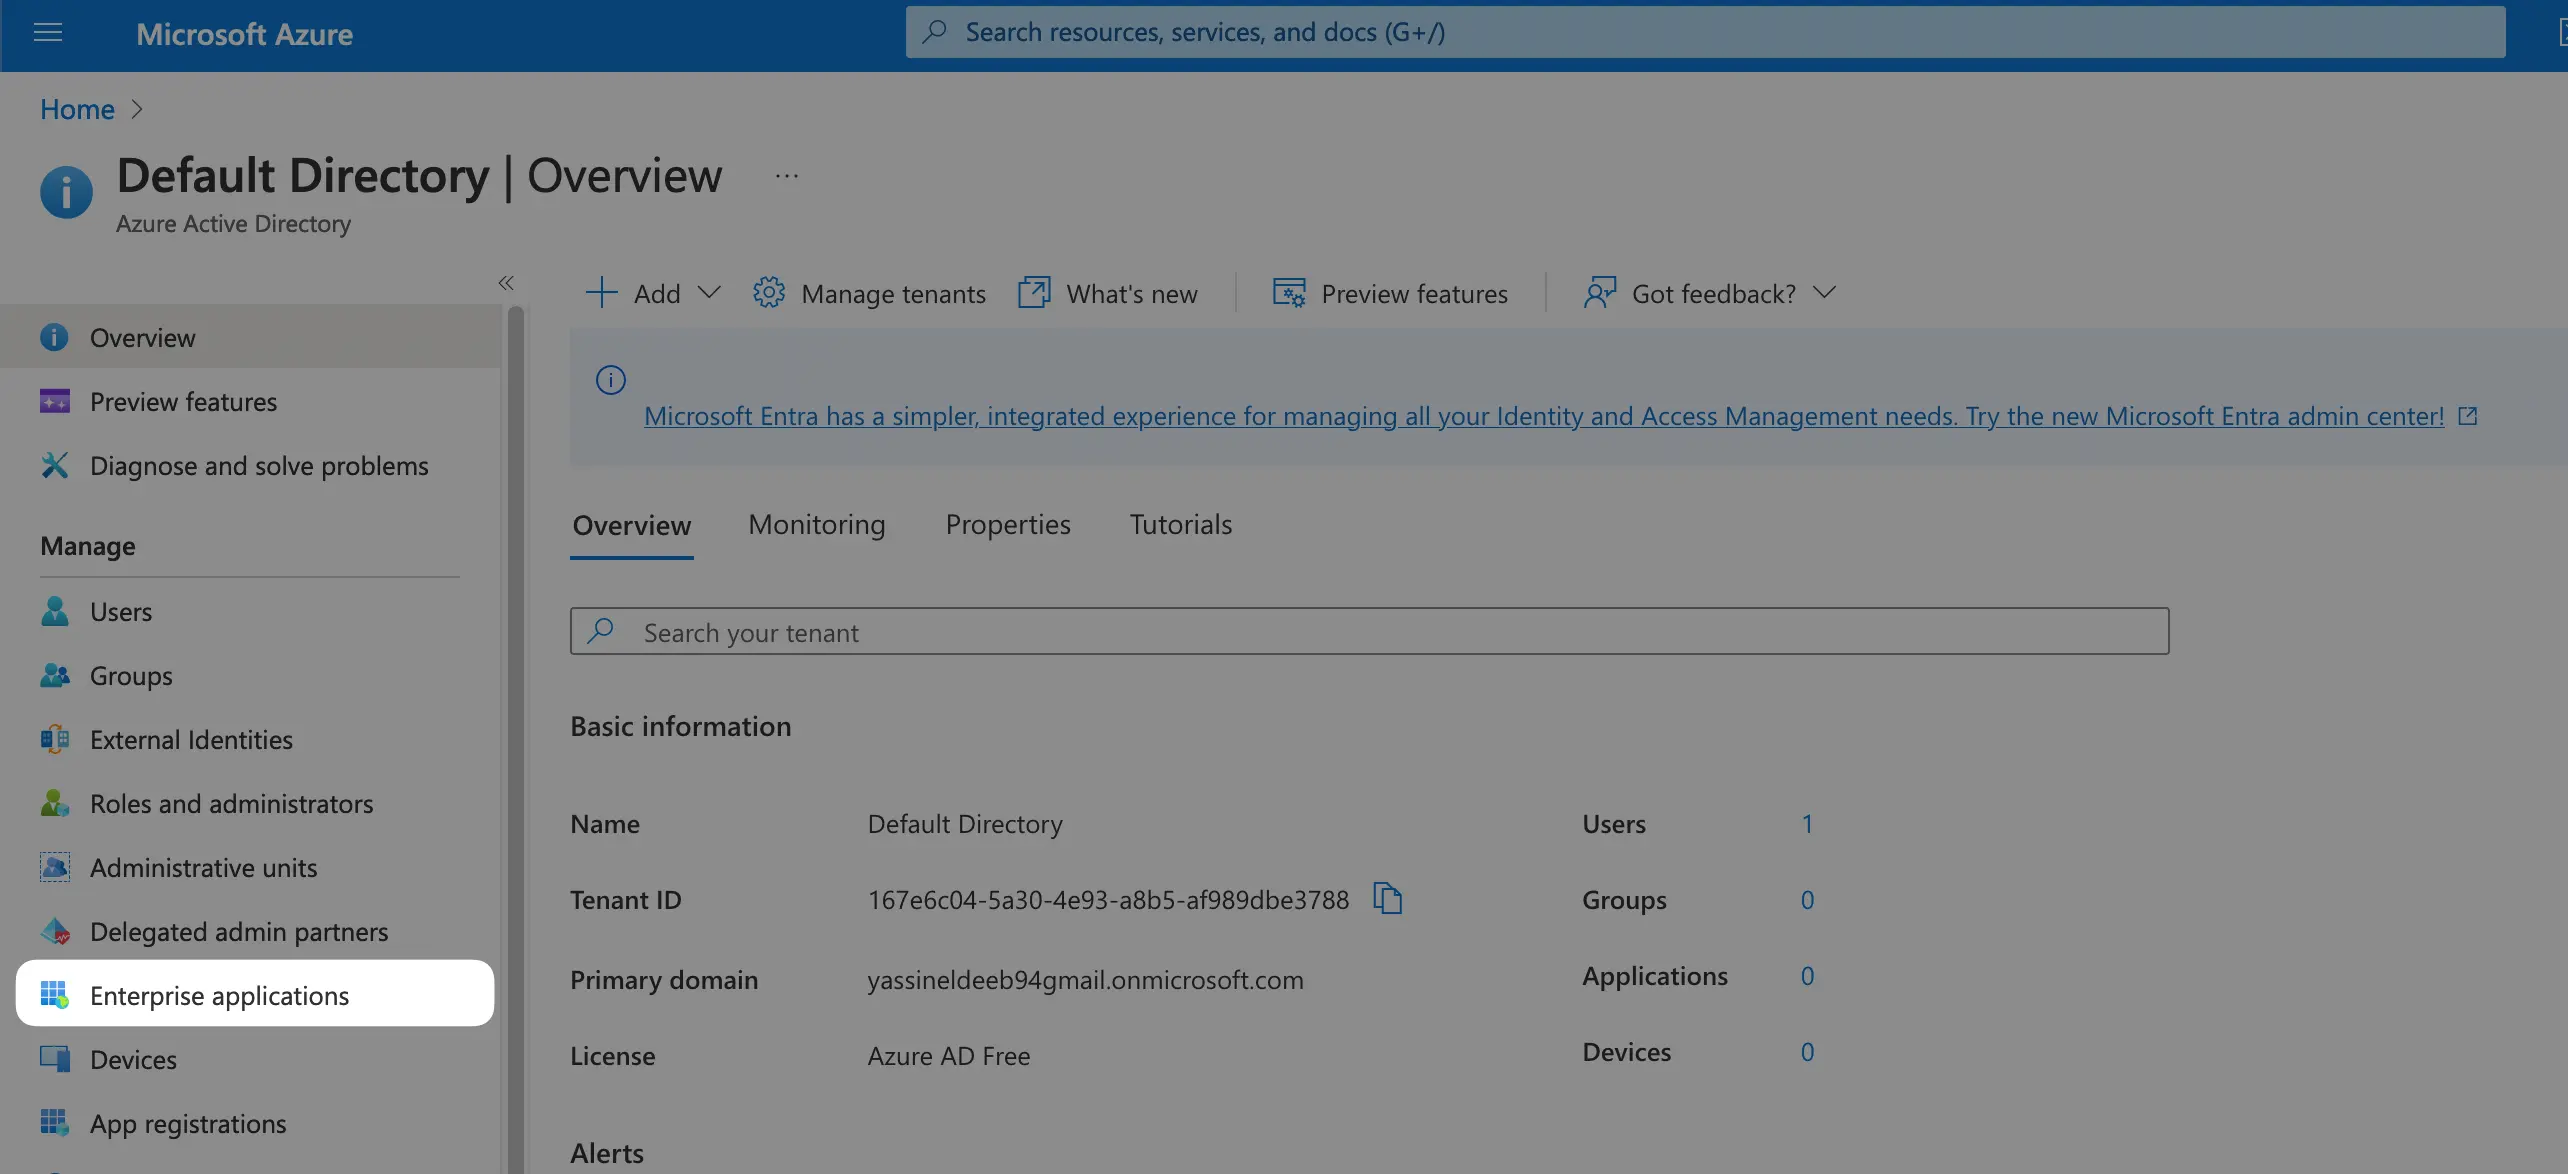
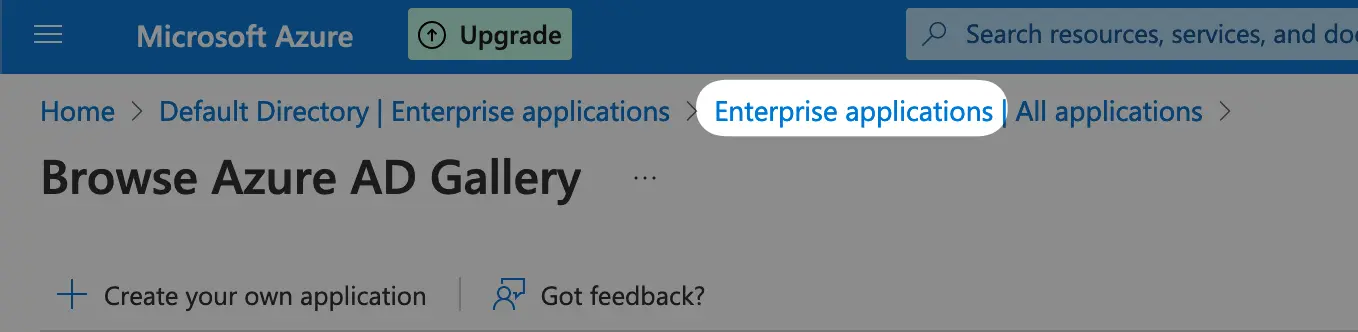
After you're logged in to Azure Portal, find the Azure Entra ID. On the left sidebar, click on the Enterprise applications under the Manage section:
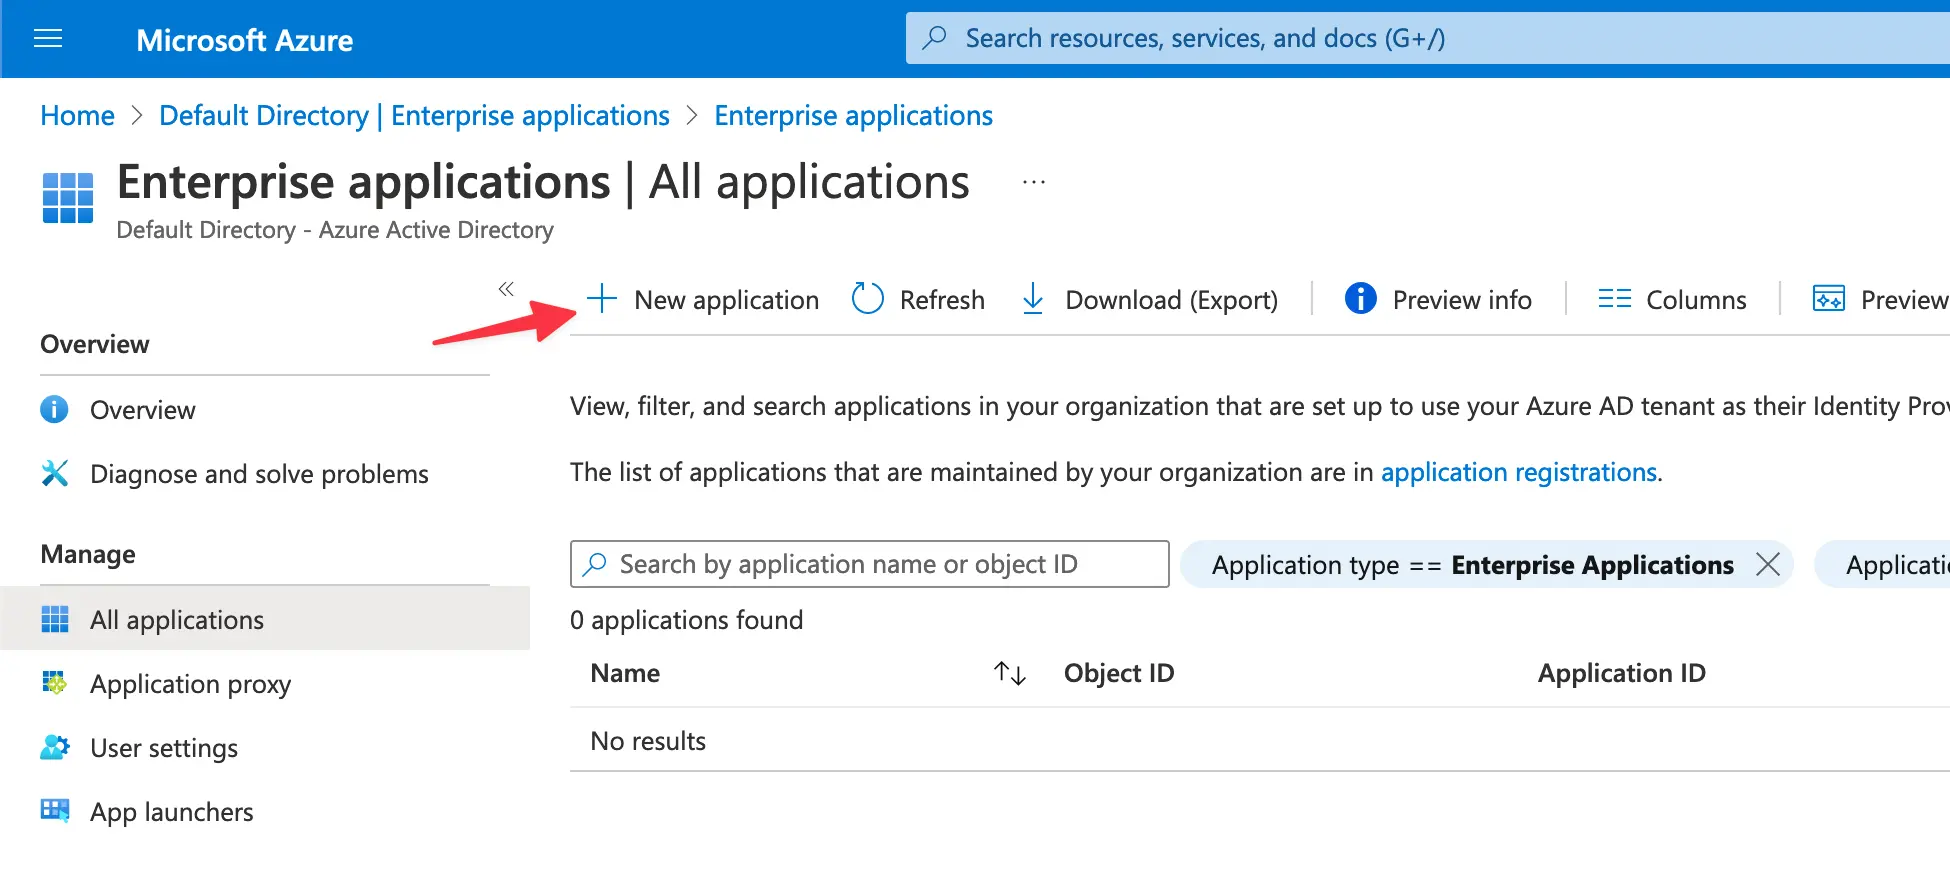
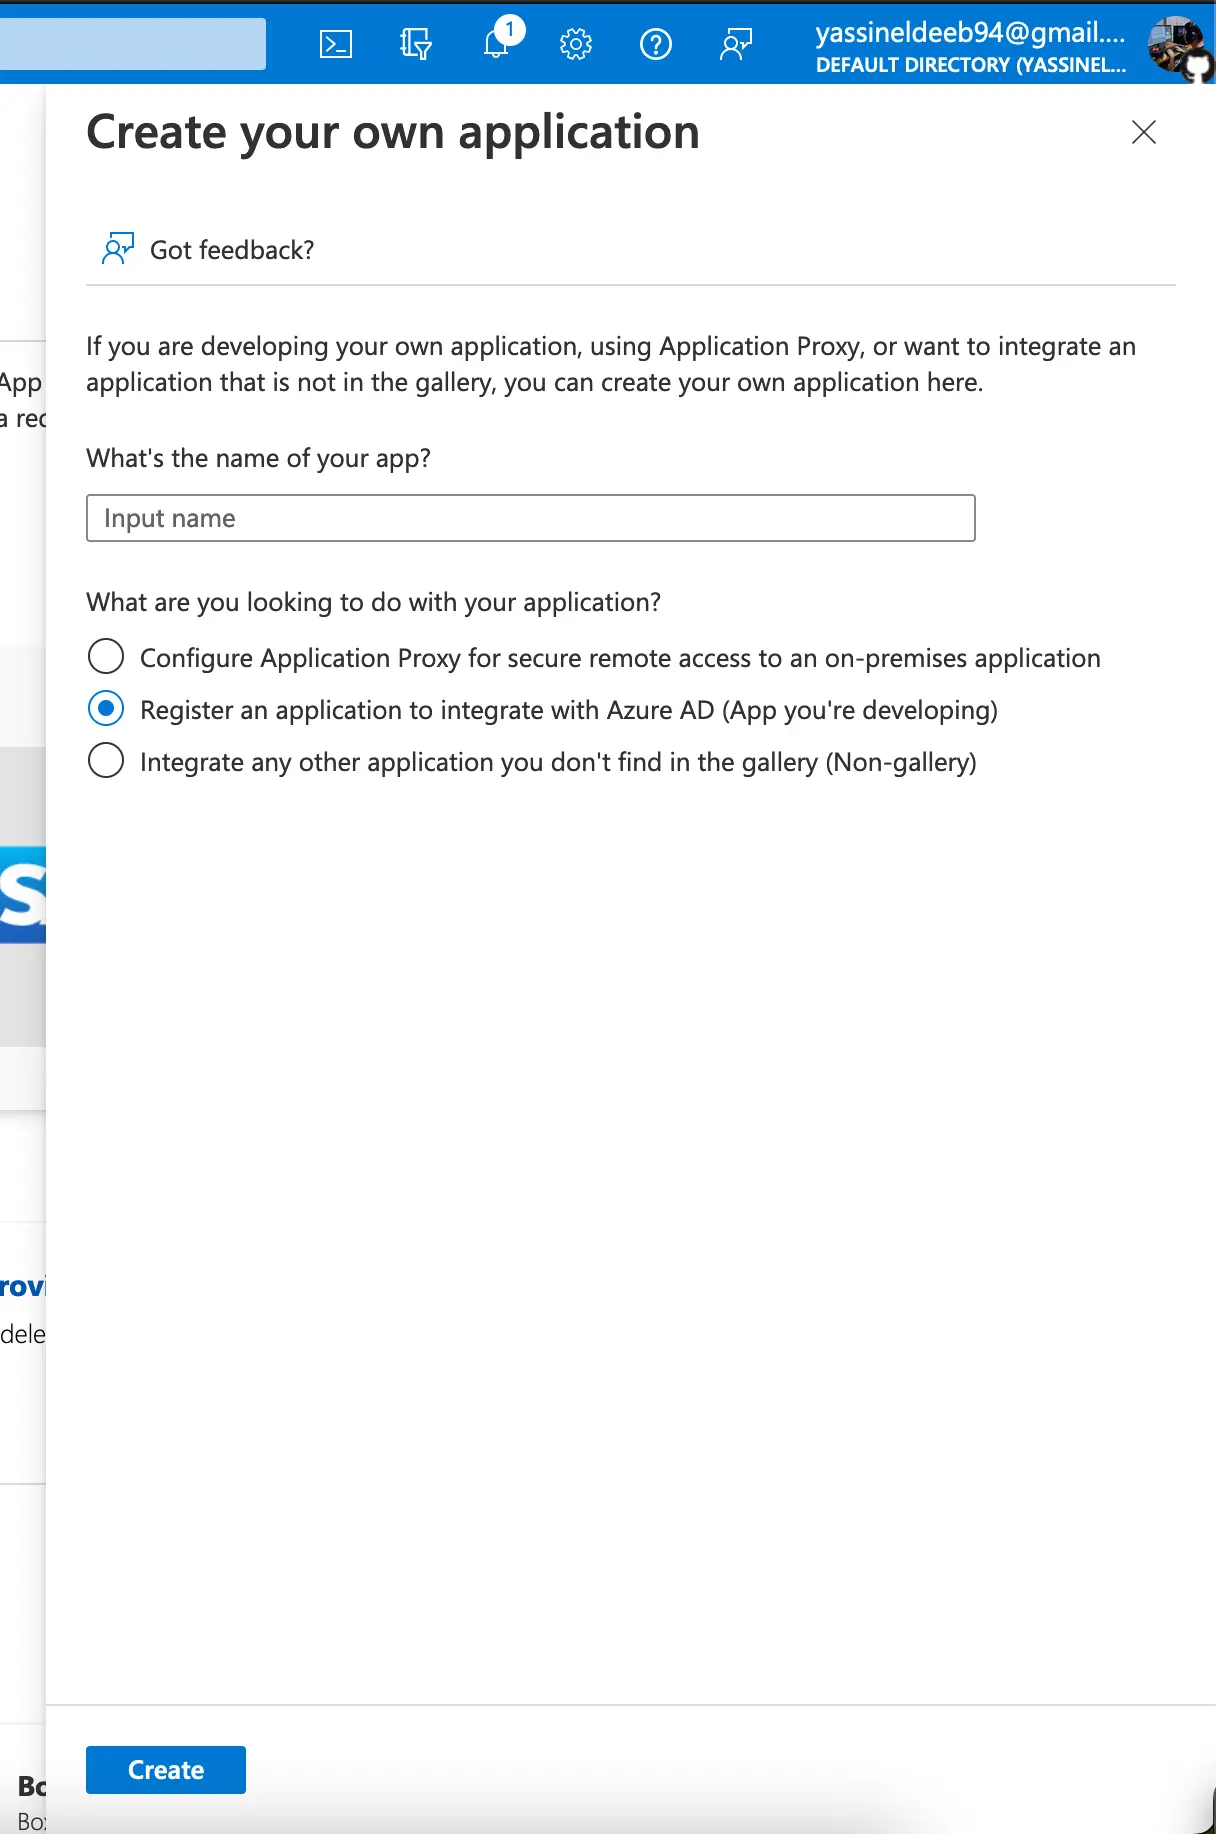
Then click on the New Application button and then click on the Create your own application button afterwards, you're gonna see the panel on the right where you should provide a name and select "Register an application to integrate with Azure AD (App you're developing)" as for the application purpose, then hit the Create button.
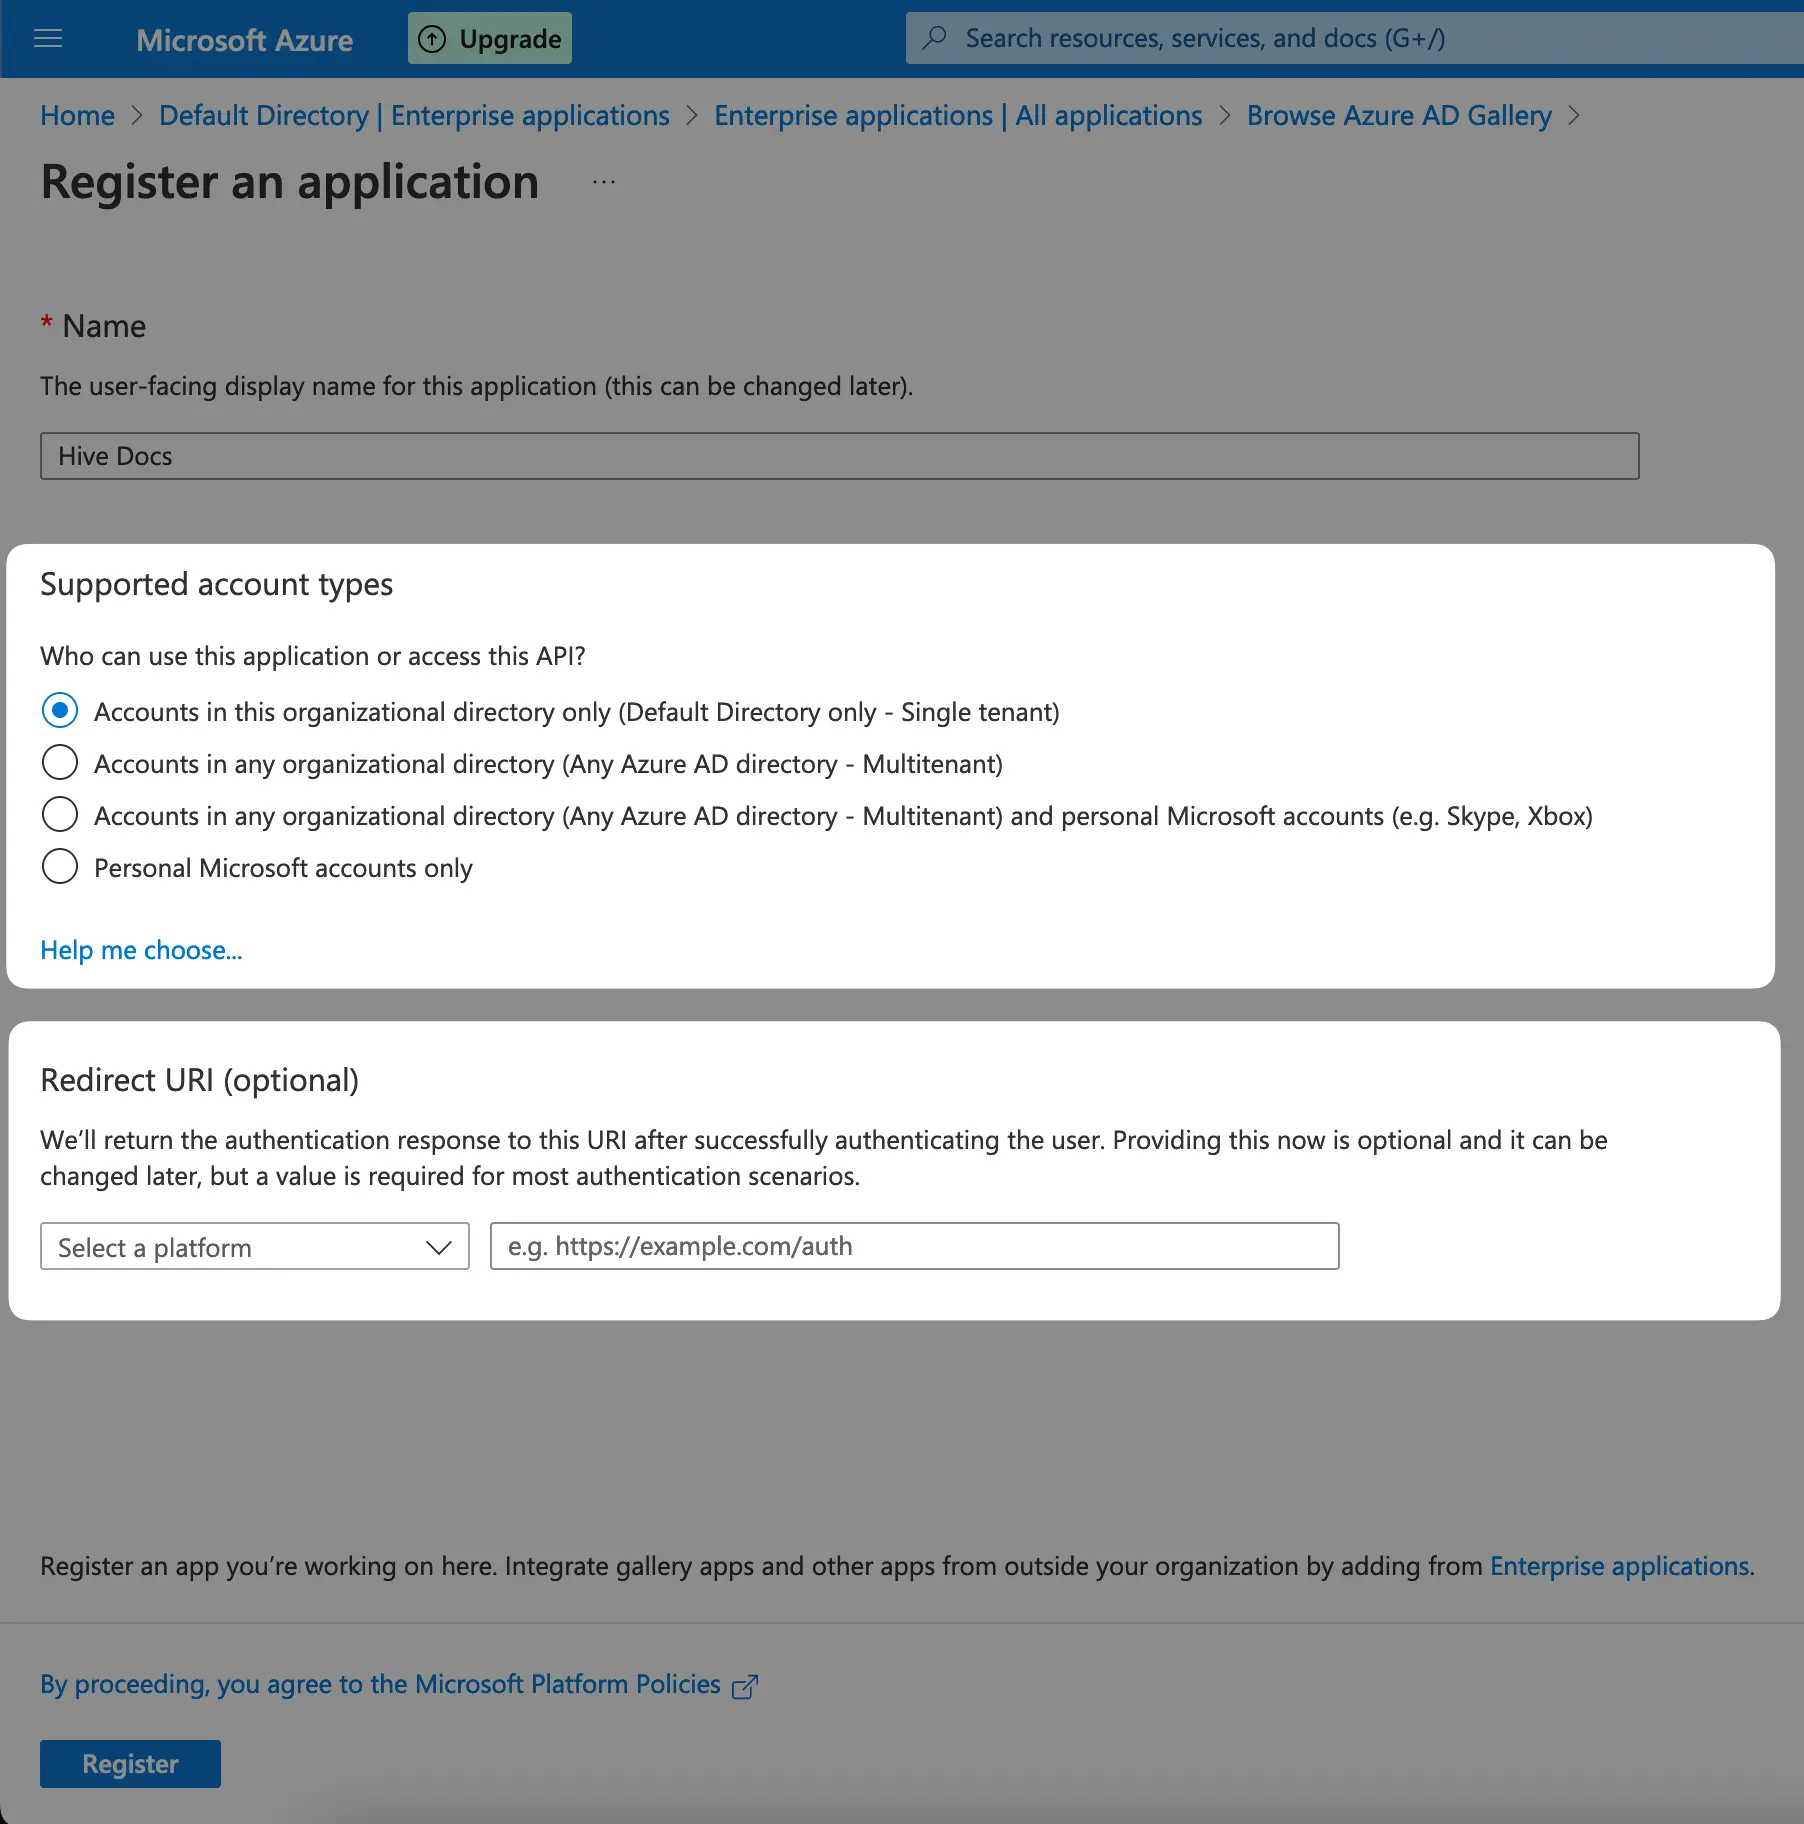
And now the last step to register your app is to define "Who can use this application or access
this API?" according to your needs, then choose Web as for the selecting the platform and
input https://app.graphql-hive.com/auth/callback/oidc in the input next to it, and finally click
Register.
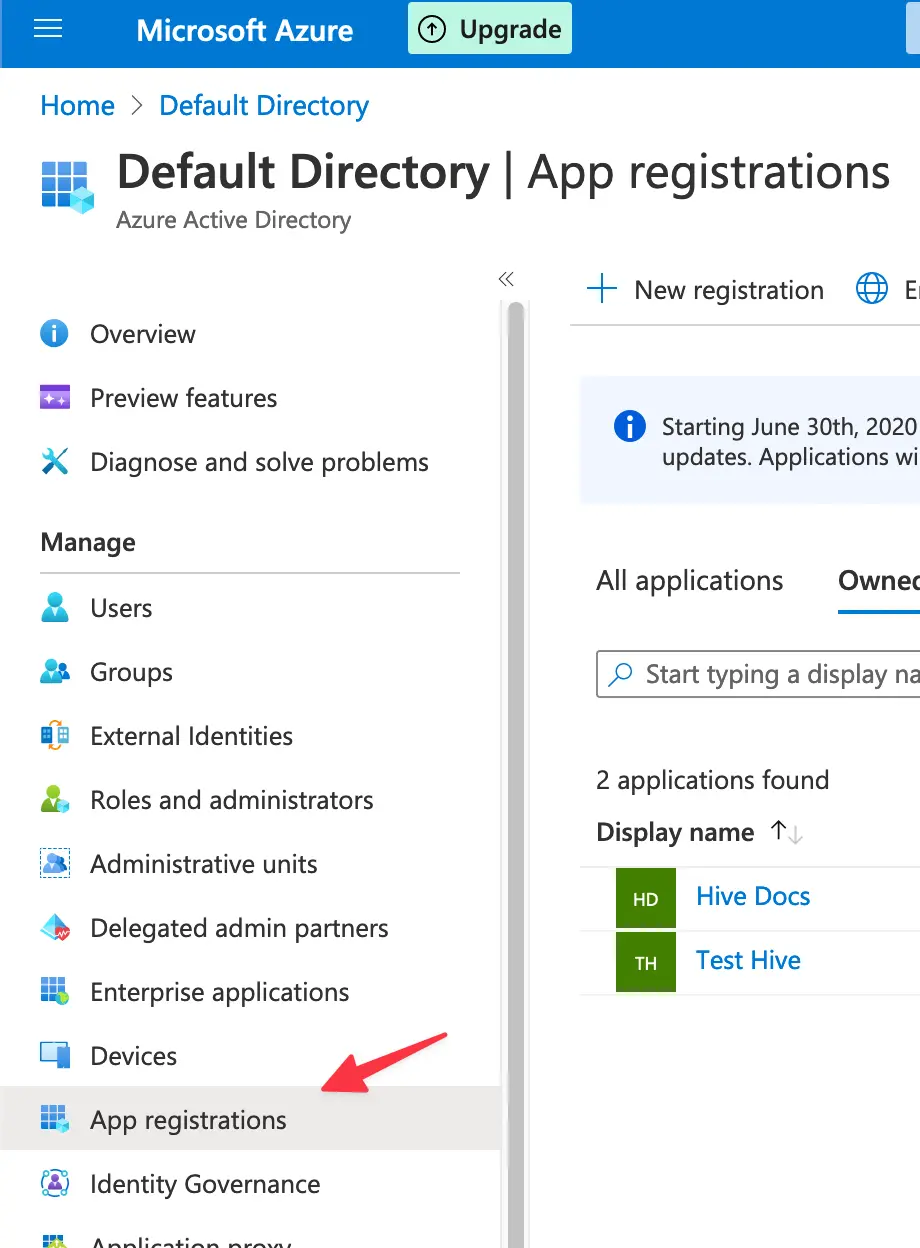
Once you see the successfully created application popup, go back to your enterprise applications by navigating through the history structure from the top, then navigate to the App registrations tab from the right sidebar, and now you're gonna see your app in the applications list, so click on your app.
And from here, we now have most of the configuration details needed by Hive for SSO connection, so now head to your Hive's organization settings tab and hit the Connect Open ID Connect Provider button:
And now you'd have to fill in a couple of inputs to connect your OpenID Azure AD's provider.
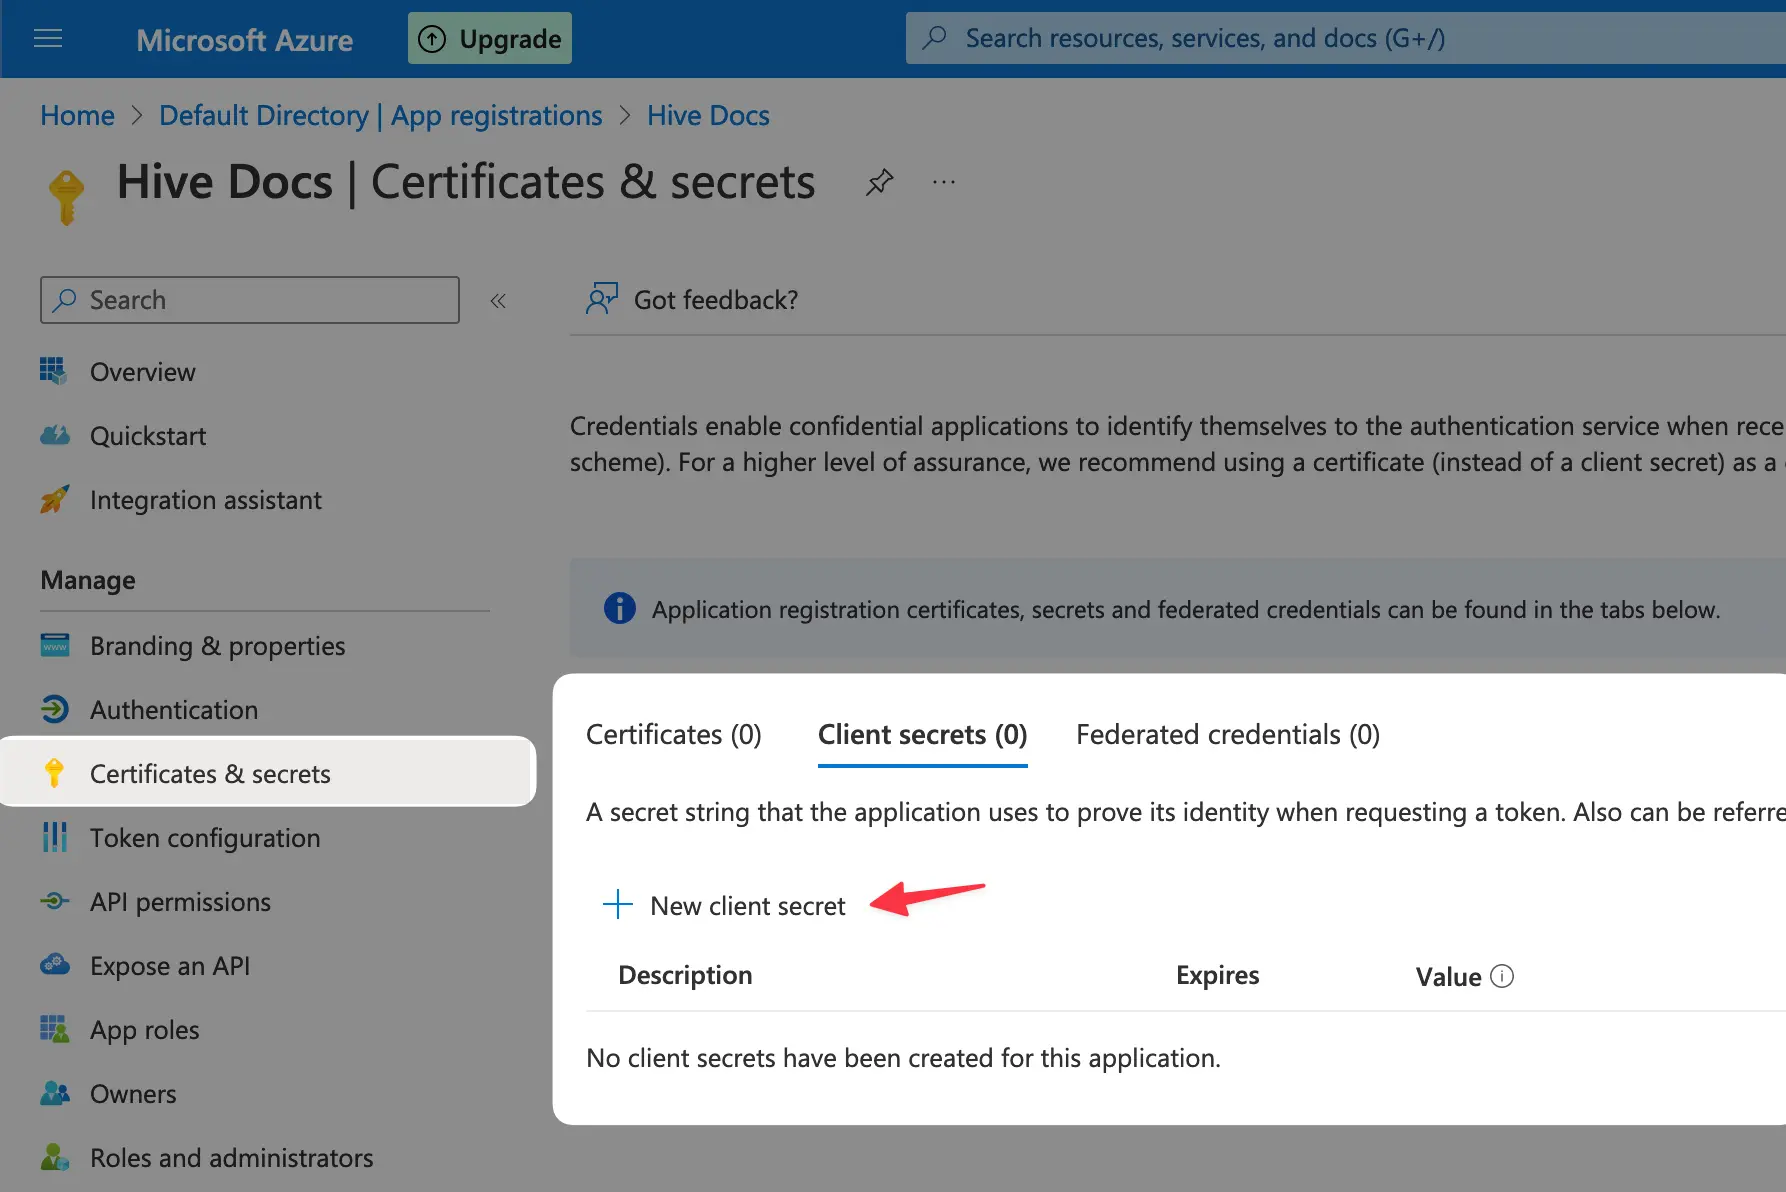
Now, create a new client secret for your app by navigating as the screenshot illustrates then on the
right panel add a description for your secret and configure your expiration configuration or leave
it as the default recommended value which is 6 months, then click Add:
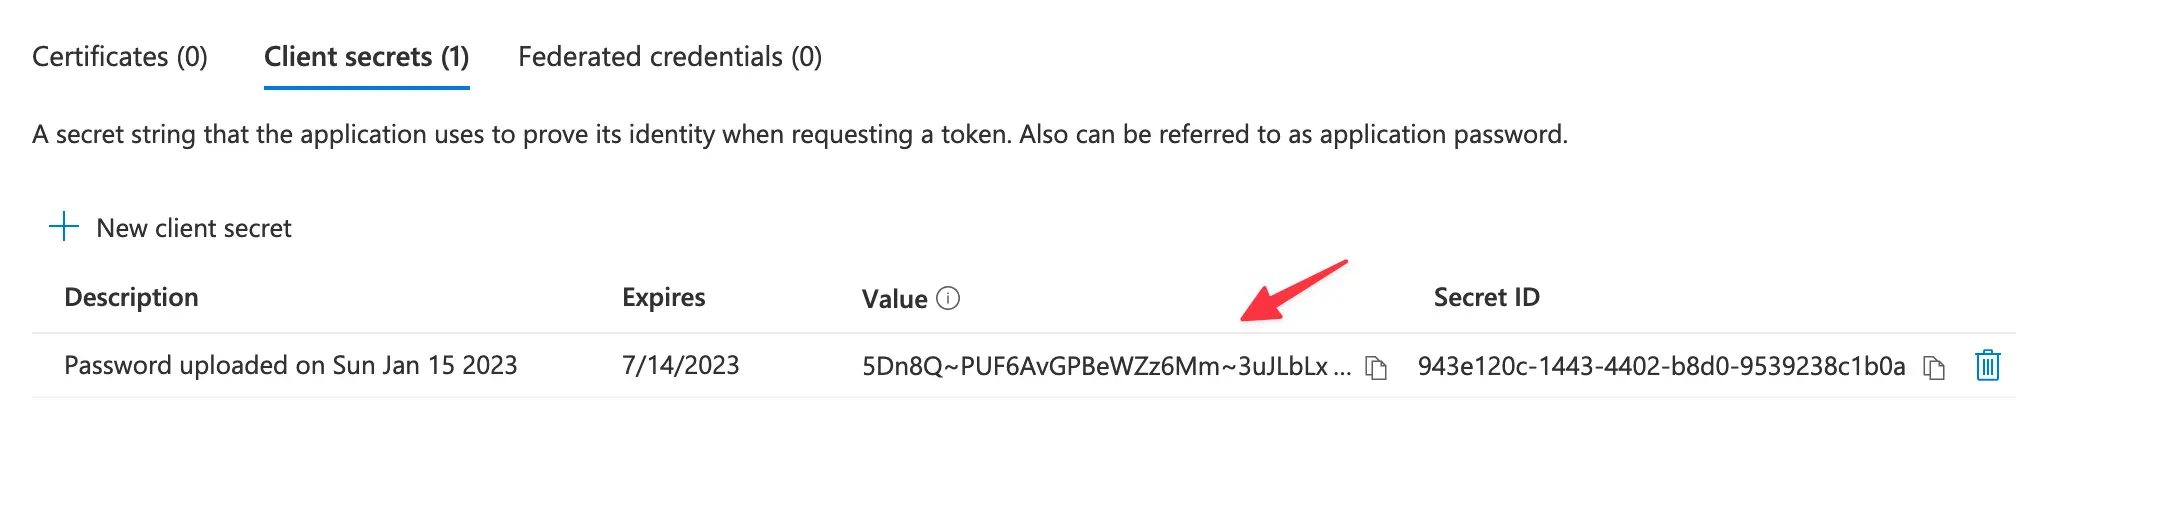
Copy and store your client secret value. Make sure to copy the value immediately, as you're not gonna be able to see it again after navigating.
Use the pointers in the screenshot to help you find your credentials to be able to fill Hive's connection inputs:
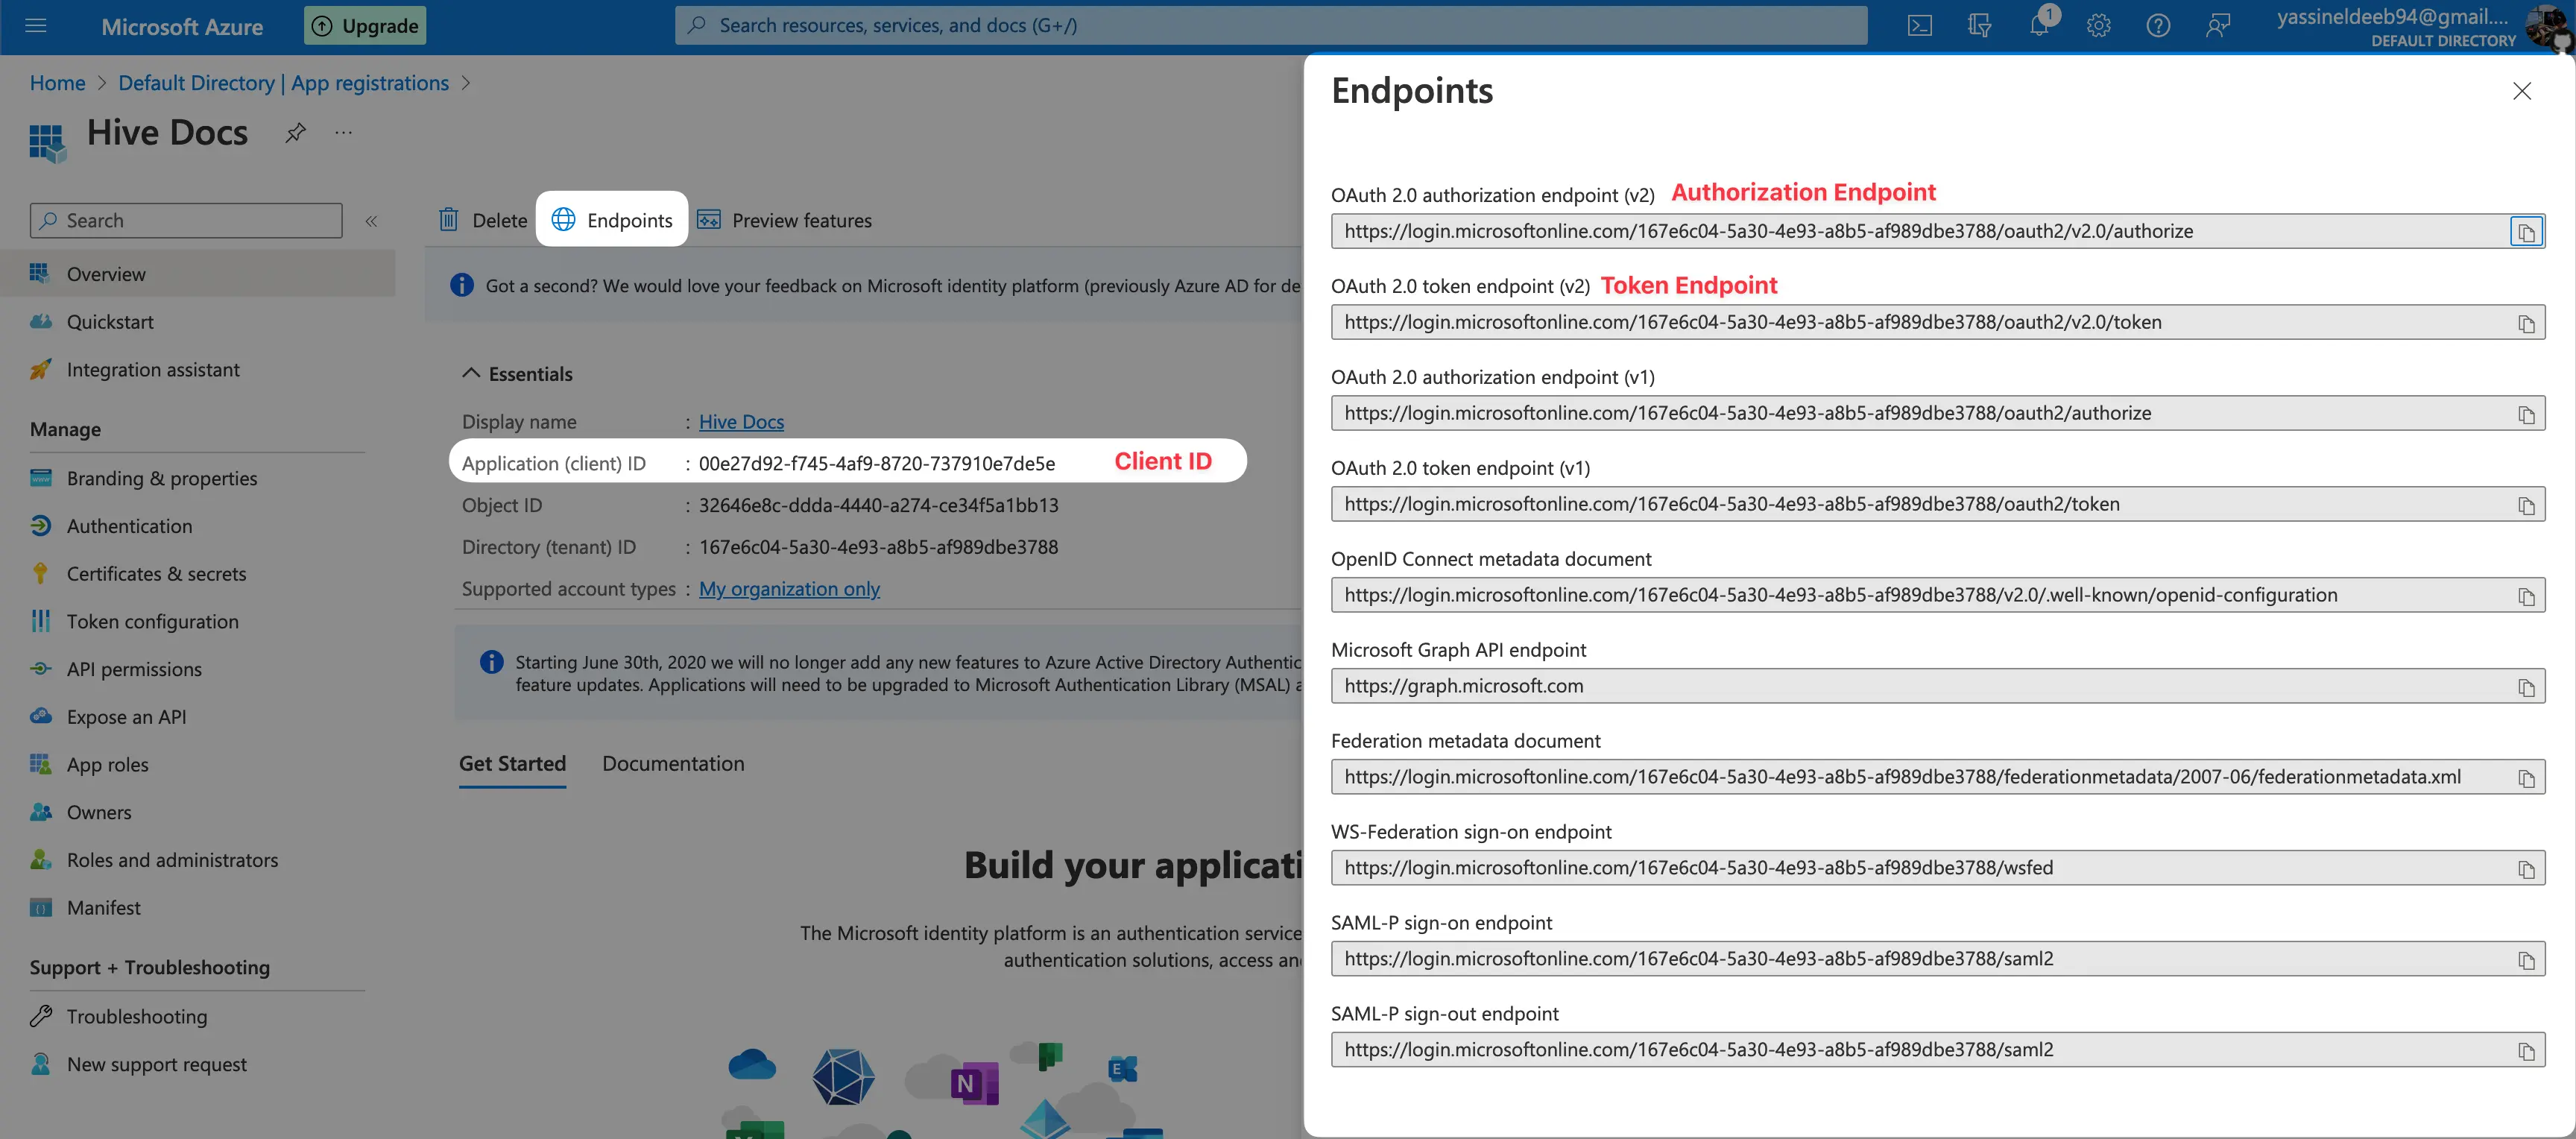
- Token Endpoint: From the screenshot above
- User Info Endpoint:
https://graph.microsoft.com/oidc/userinfo - Authorization Endpoint: From the screenshot above
- Client ID: From the screenshot above
- Client Secret: The one you have just created.
After you're done, click the Connect OIDC Provider button.
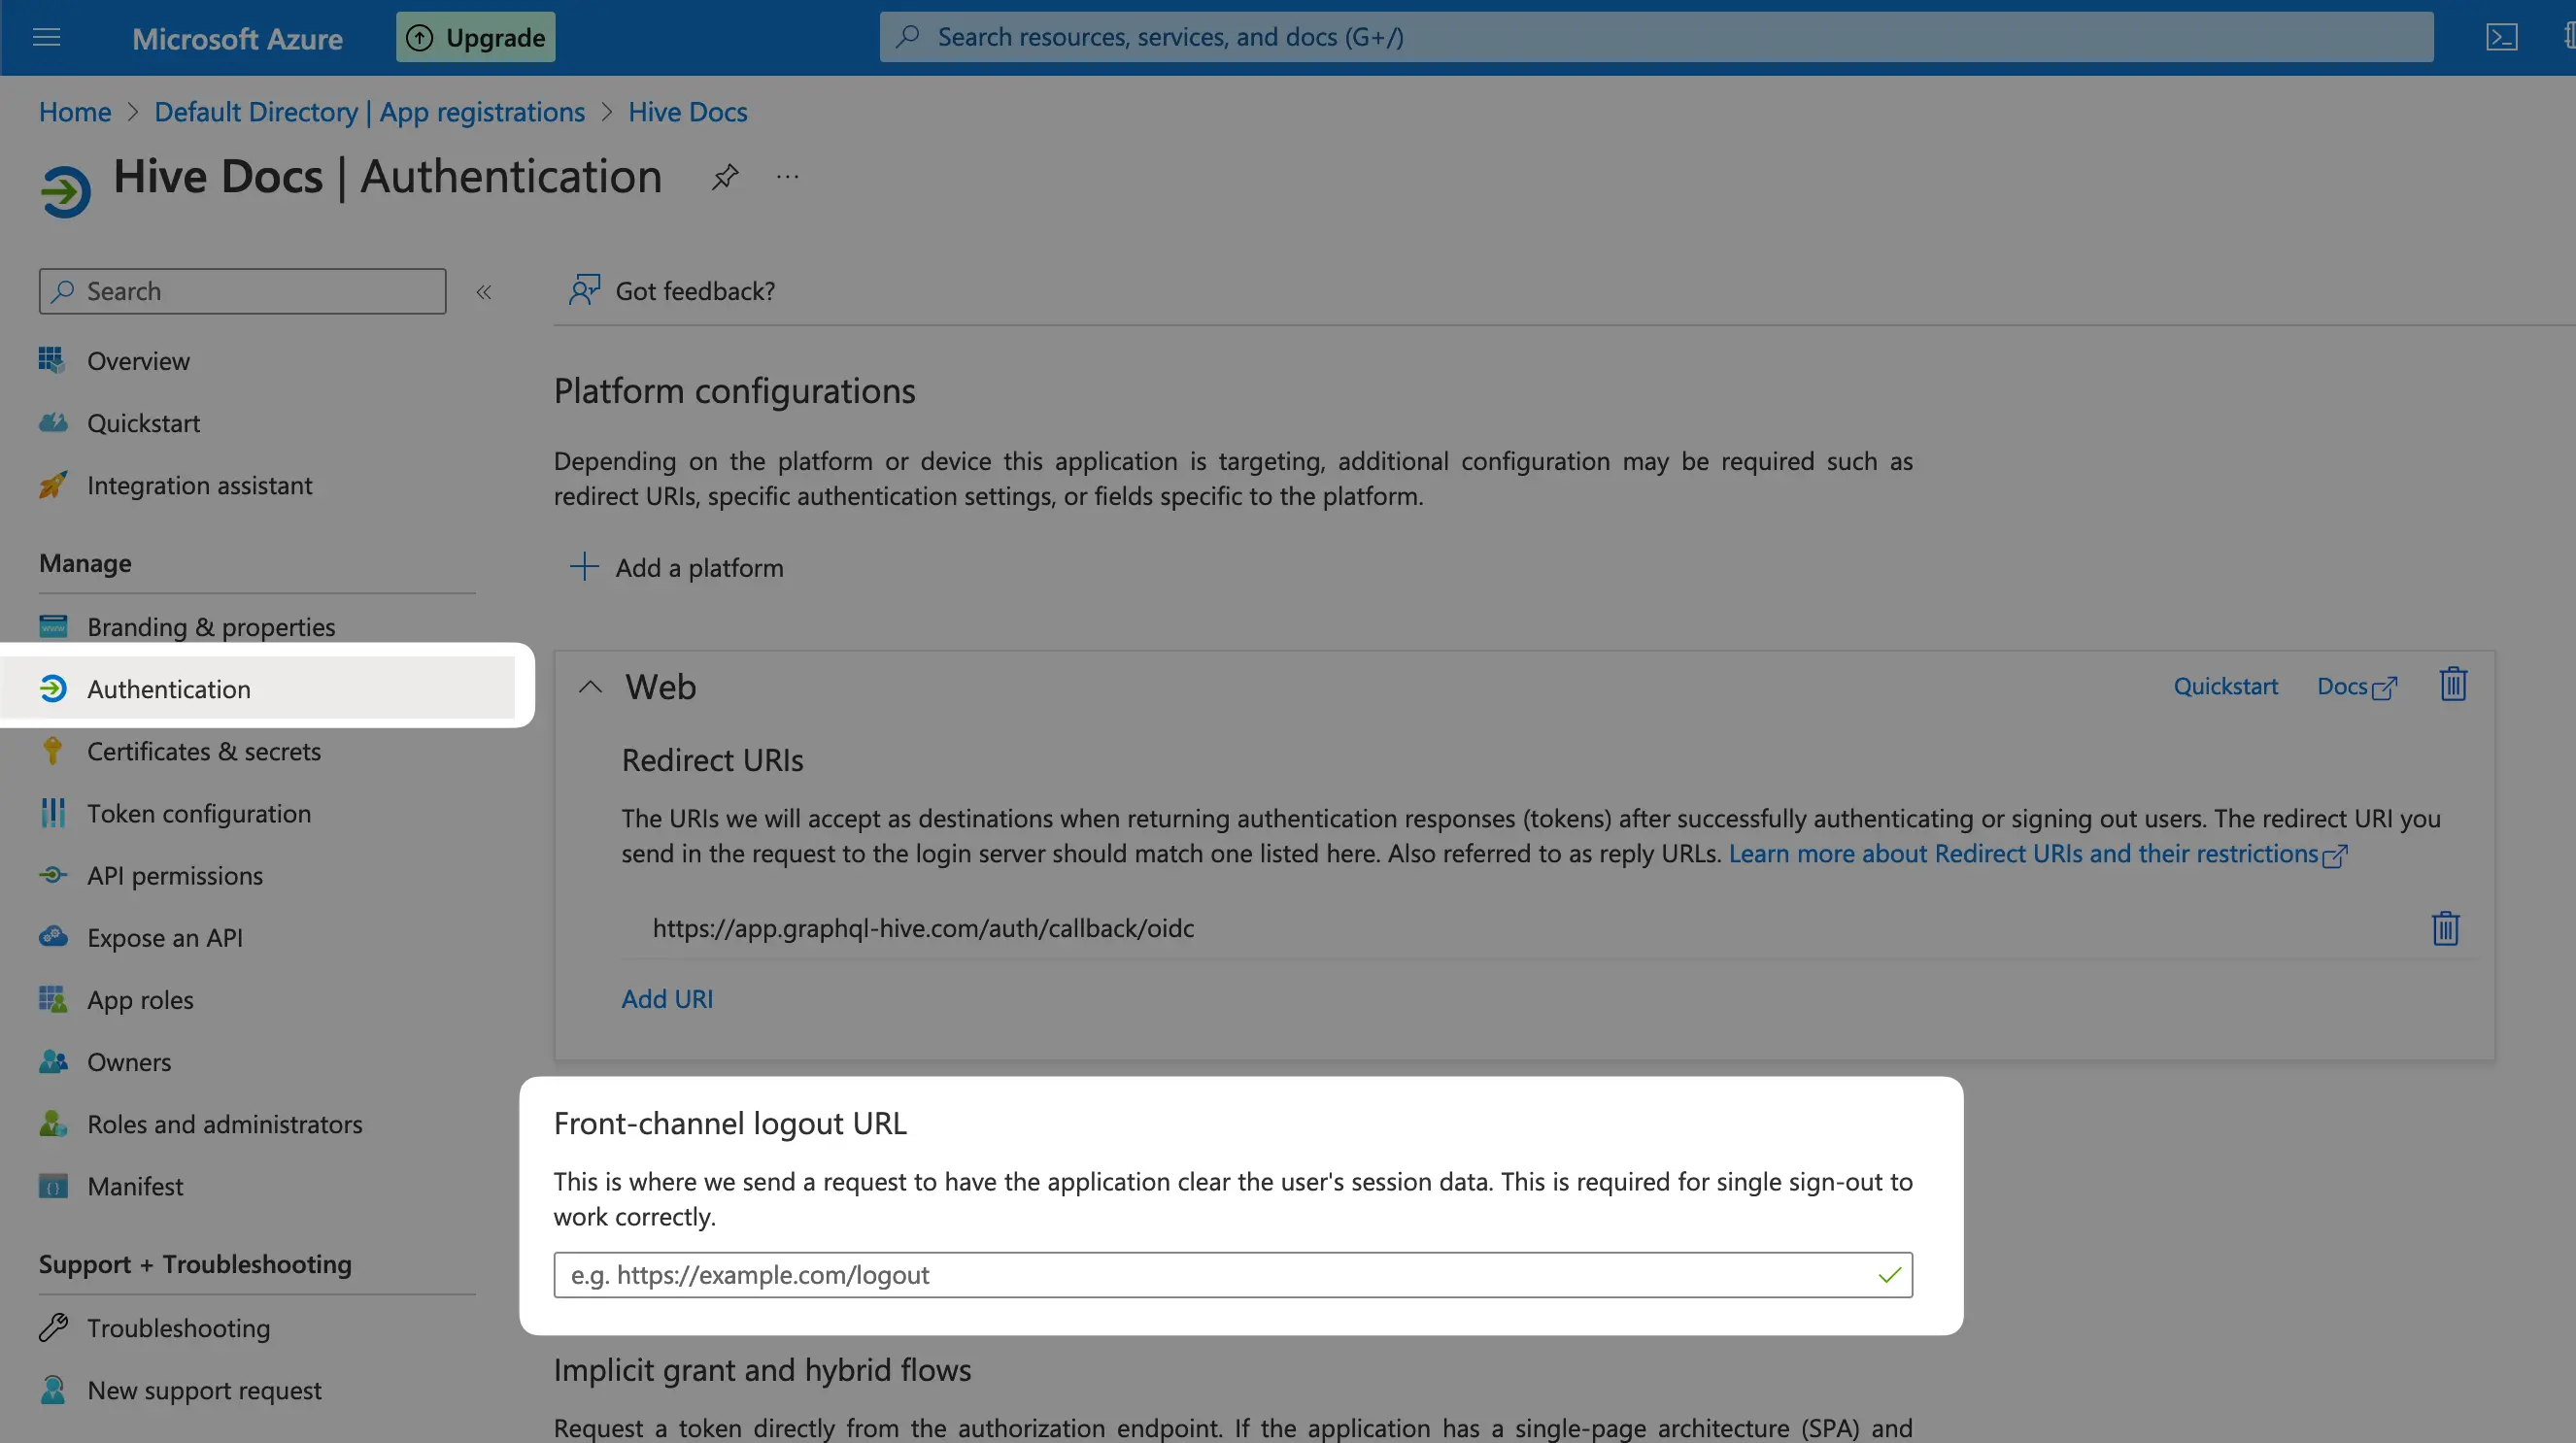
And we're almost done, go to the "Authentication" tab and scroll done to the "Front-channel
logout URL" section, and fill in the input with the following URL:
https://app.graphql-hive.com/logout, then click Save.
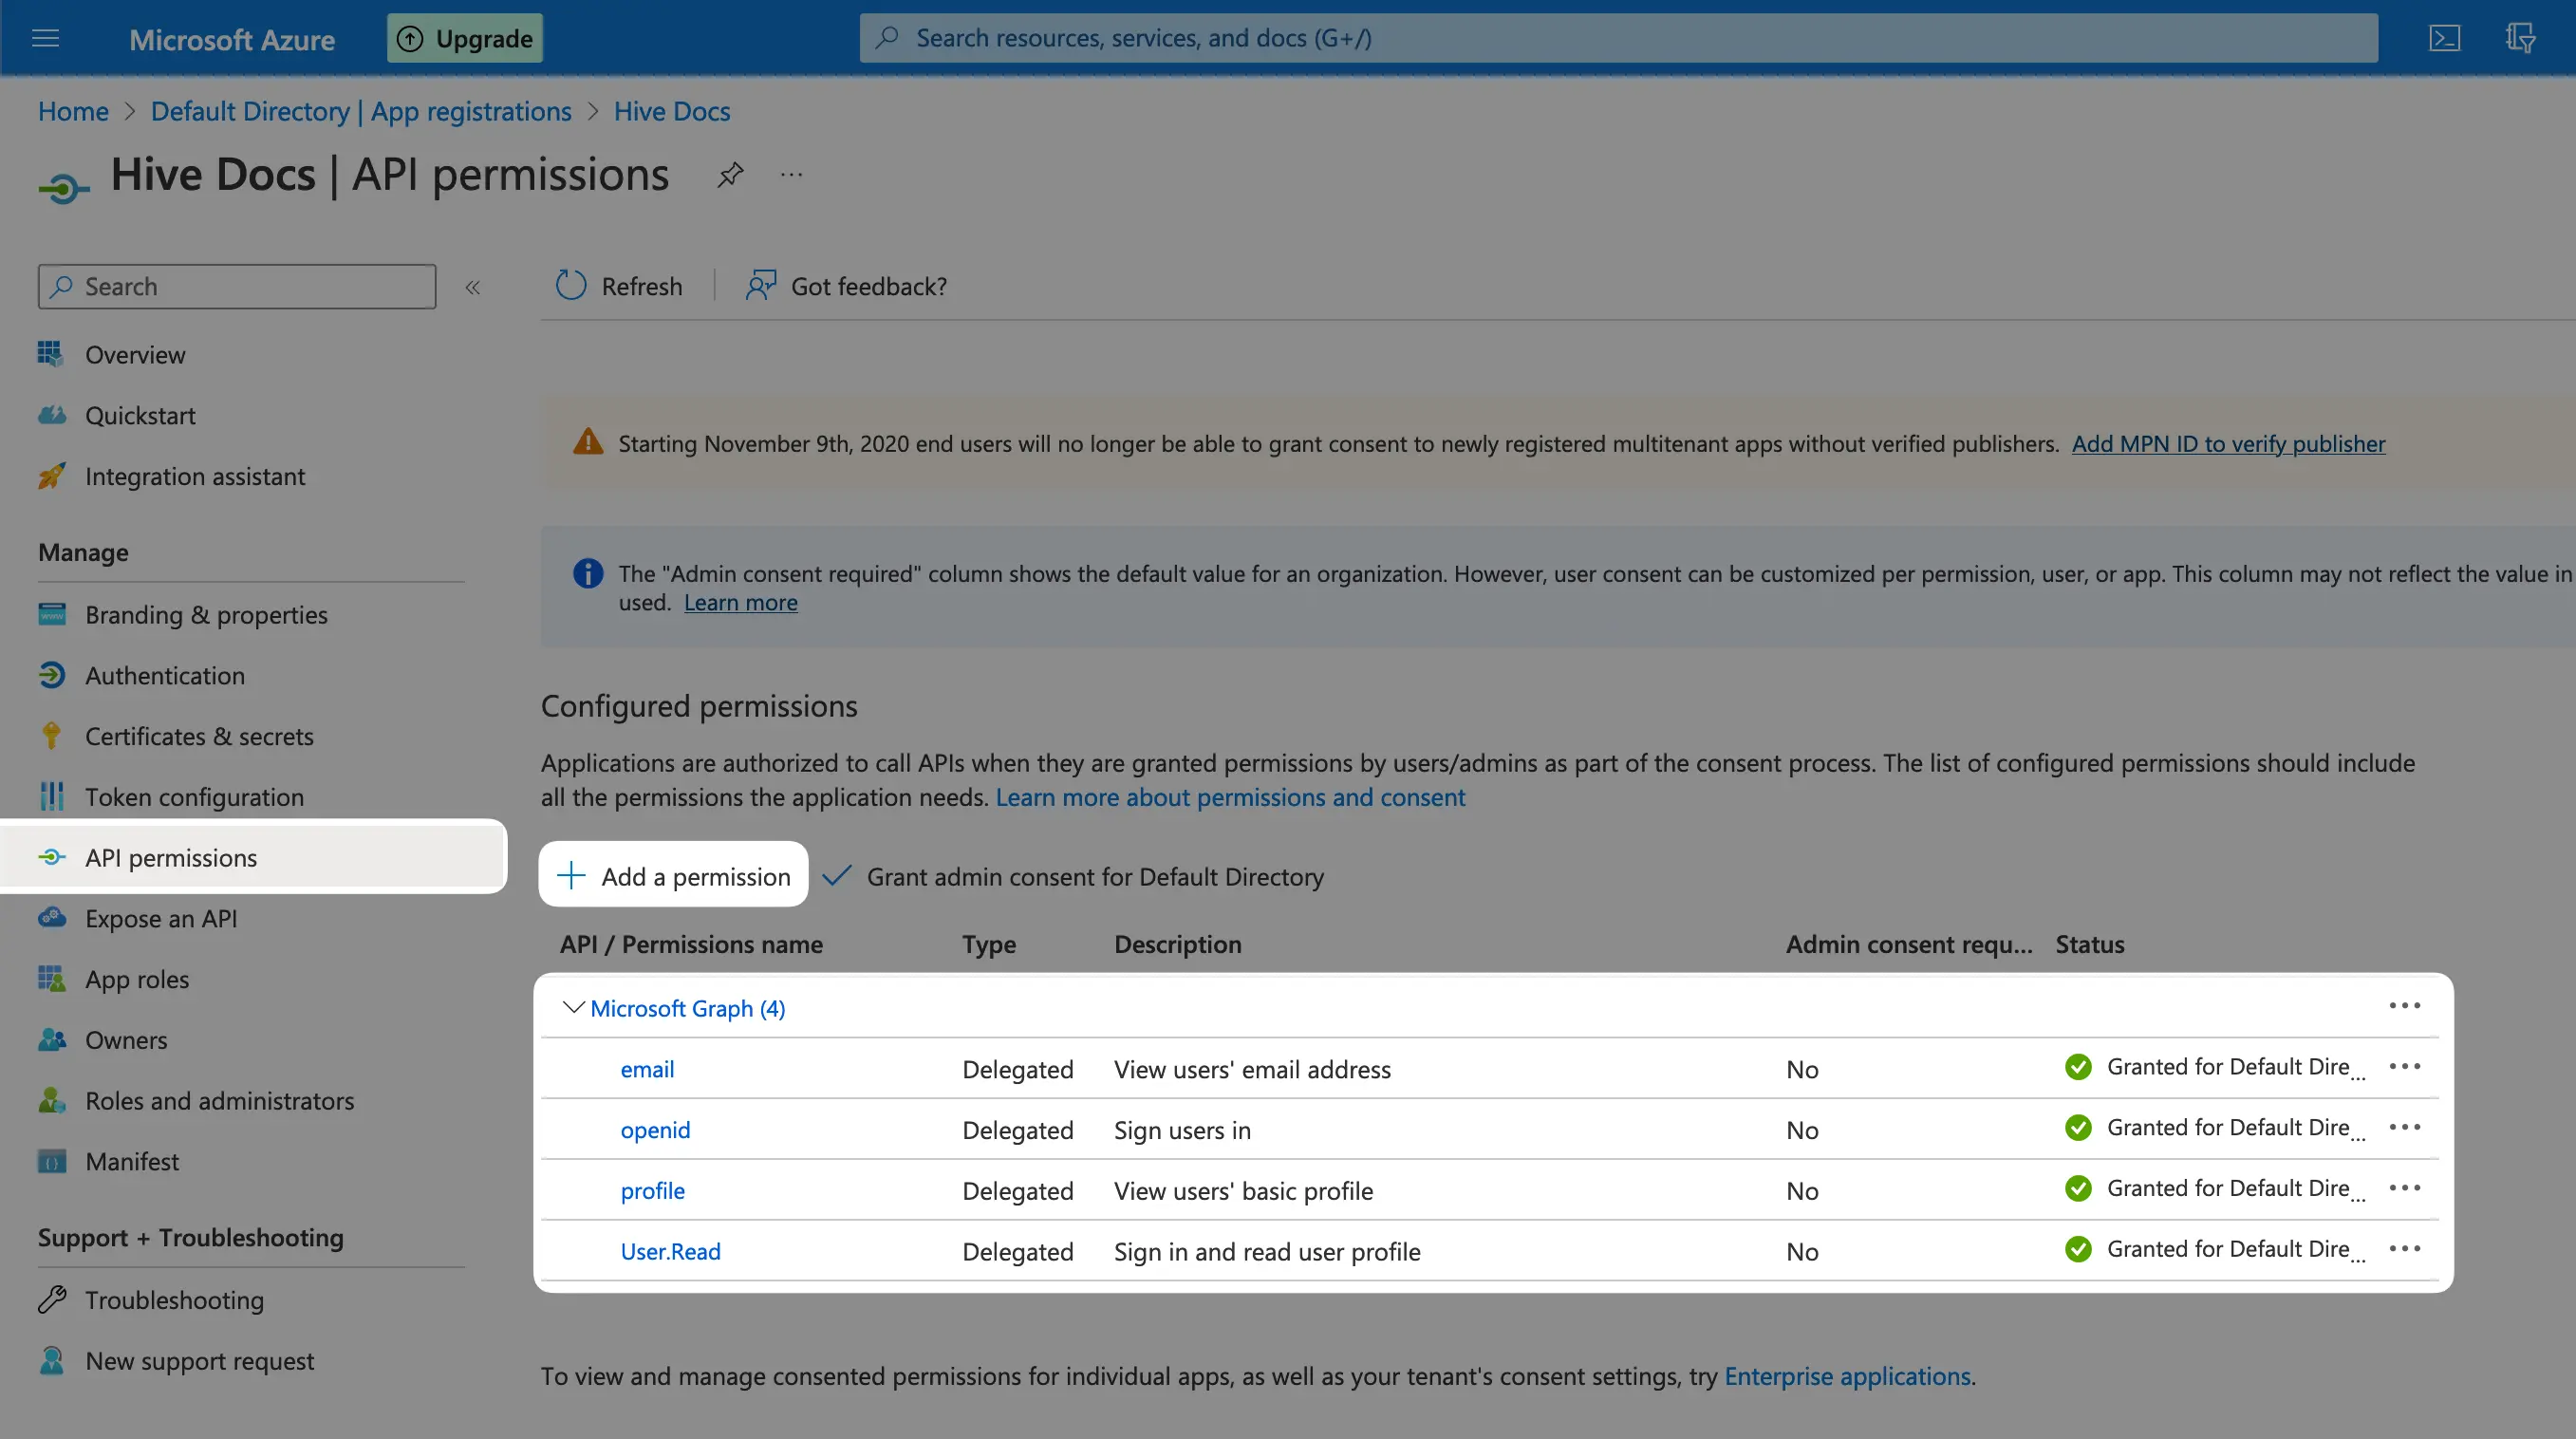
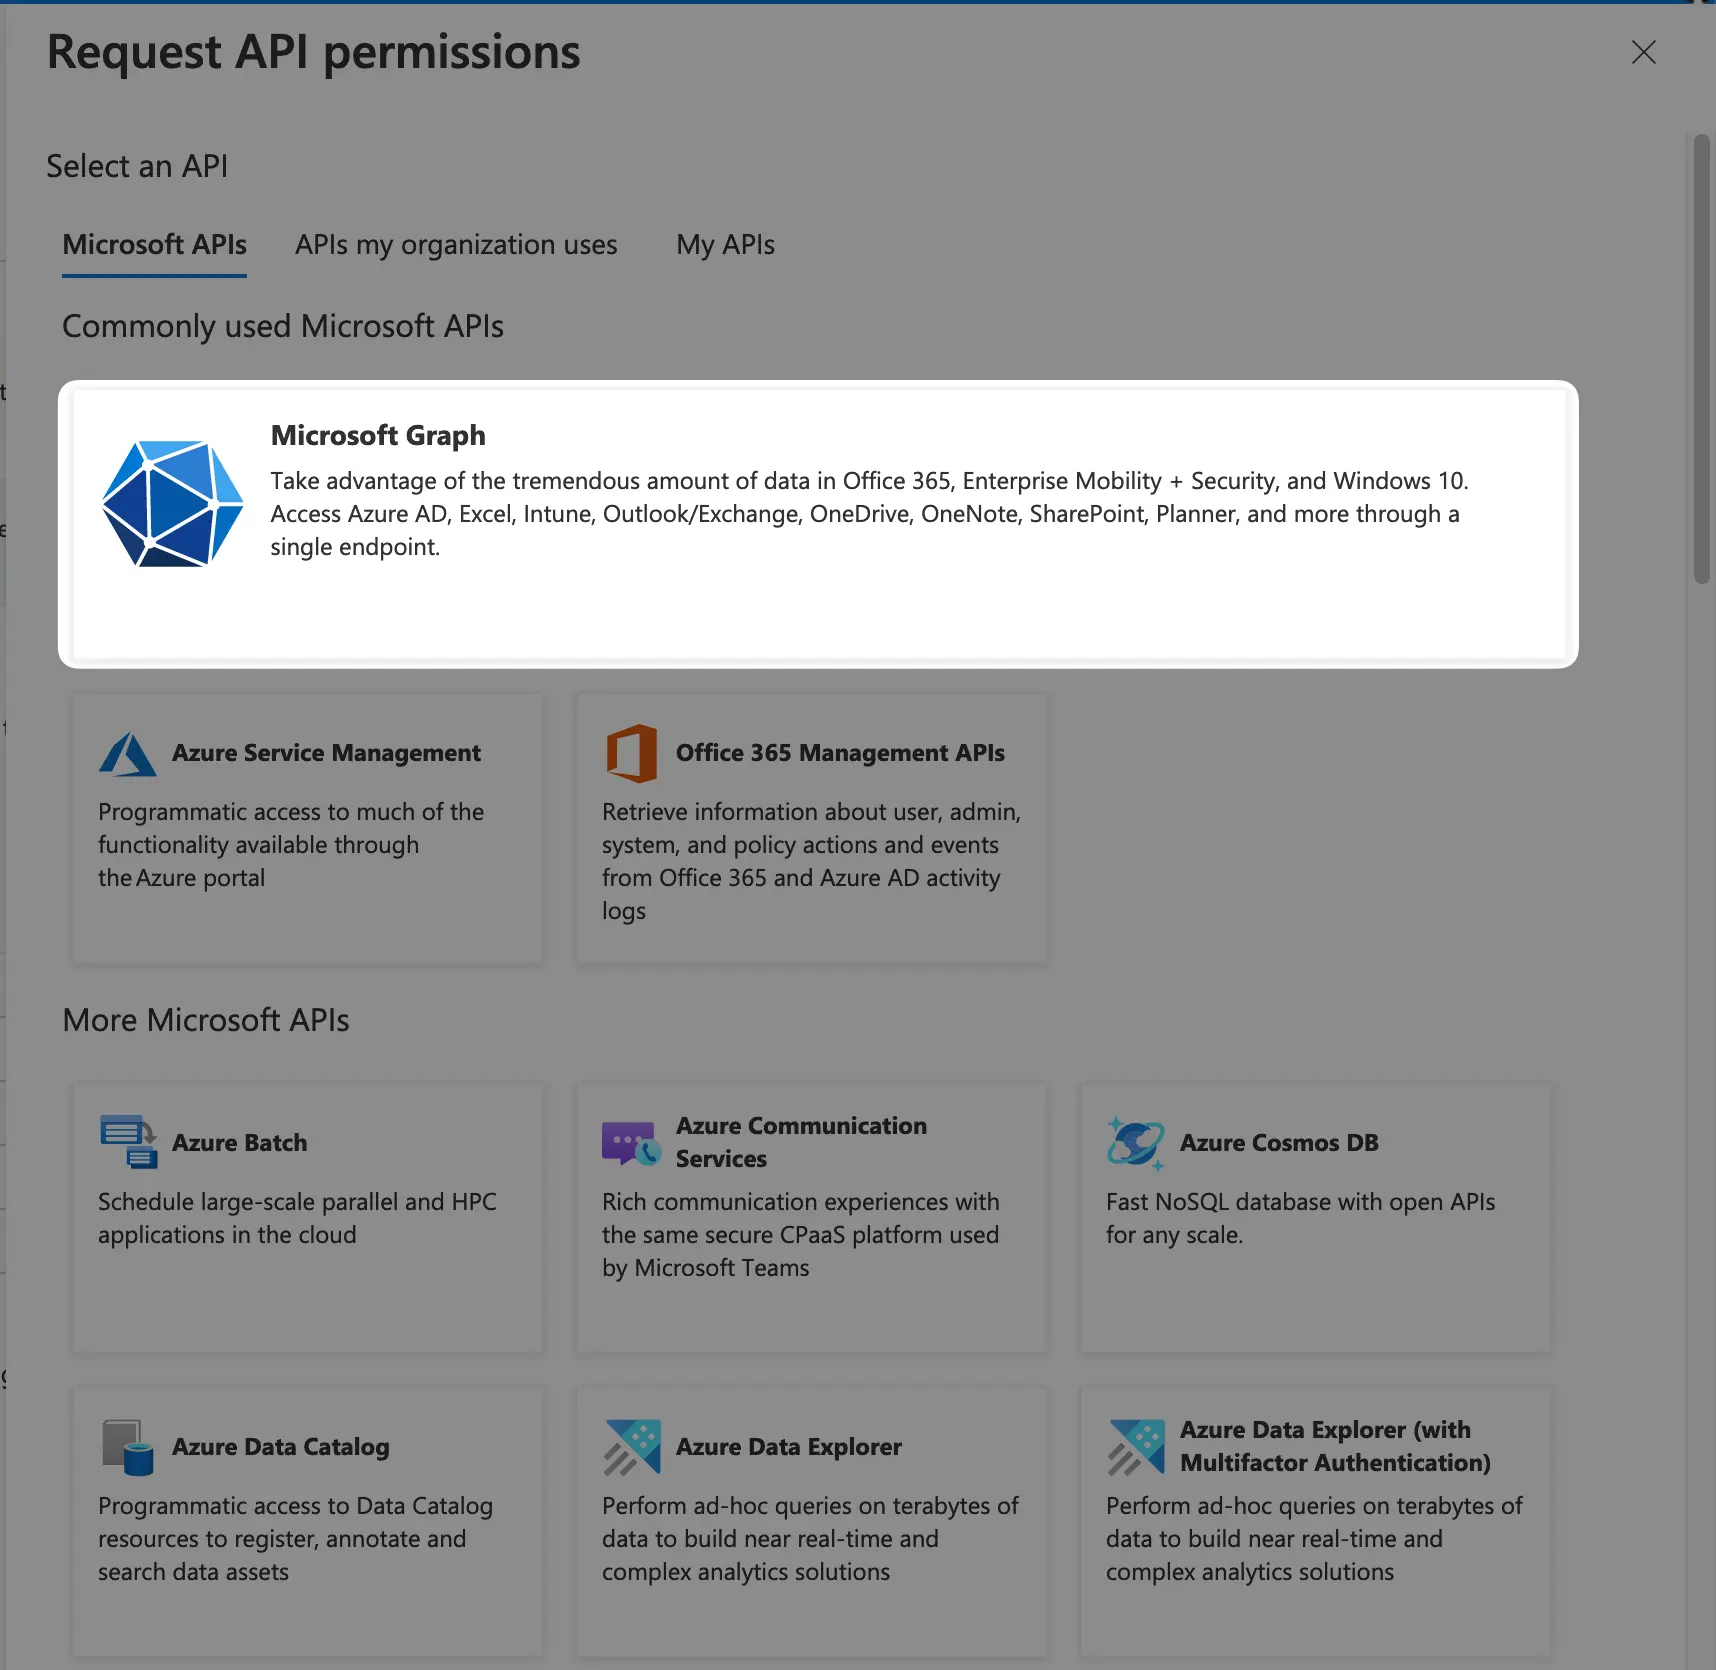
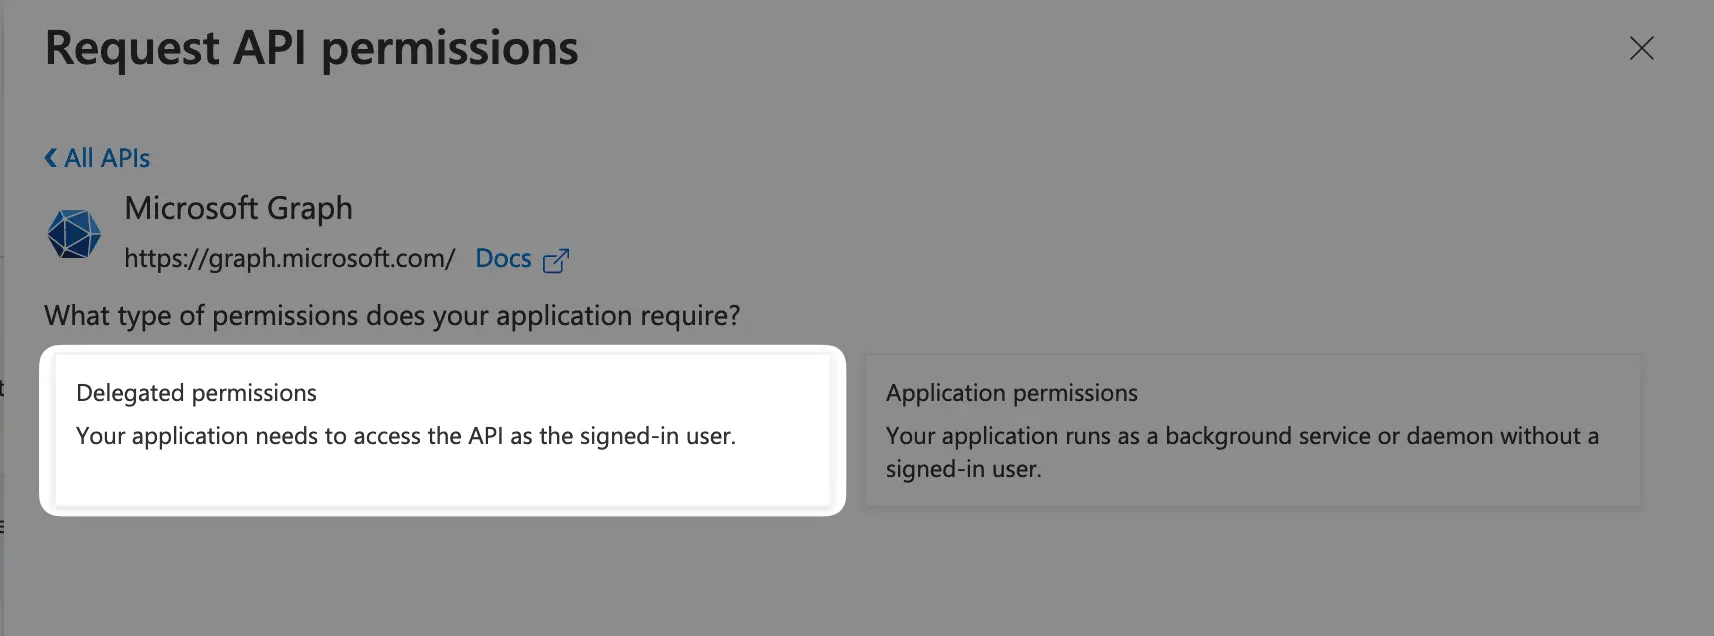
And for the last step, we need to add the permissions for Azure AD to be able to access the user info after authentication, so use the "API permissions section on AD portal, then click the Add a permission button, you're gonna see a right panel, choose Microsoft Graph then Delegated permissions. And make sure to add all of the listed permissions by using the search bar and checking the checkboxes:
emailopenidprofileUser.read
After you're done, click the Add permissions button.
Azure AD and email field access
Granting the permission for email unfortunately doesn't guarantee a successful login, because in
Azure AD, the email field is marked as optional, while it's required for a successful integration
with Hive.
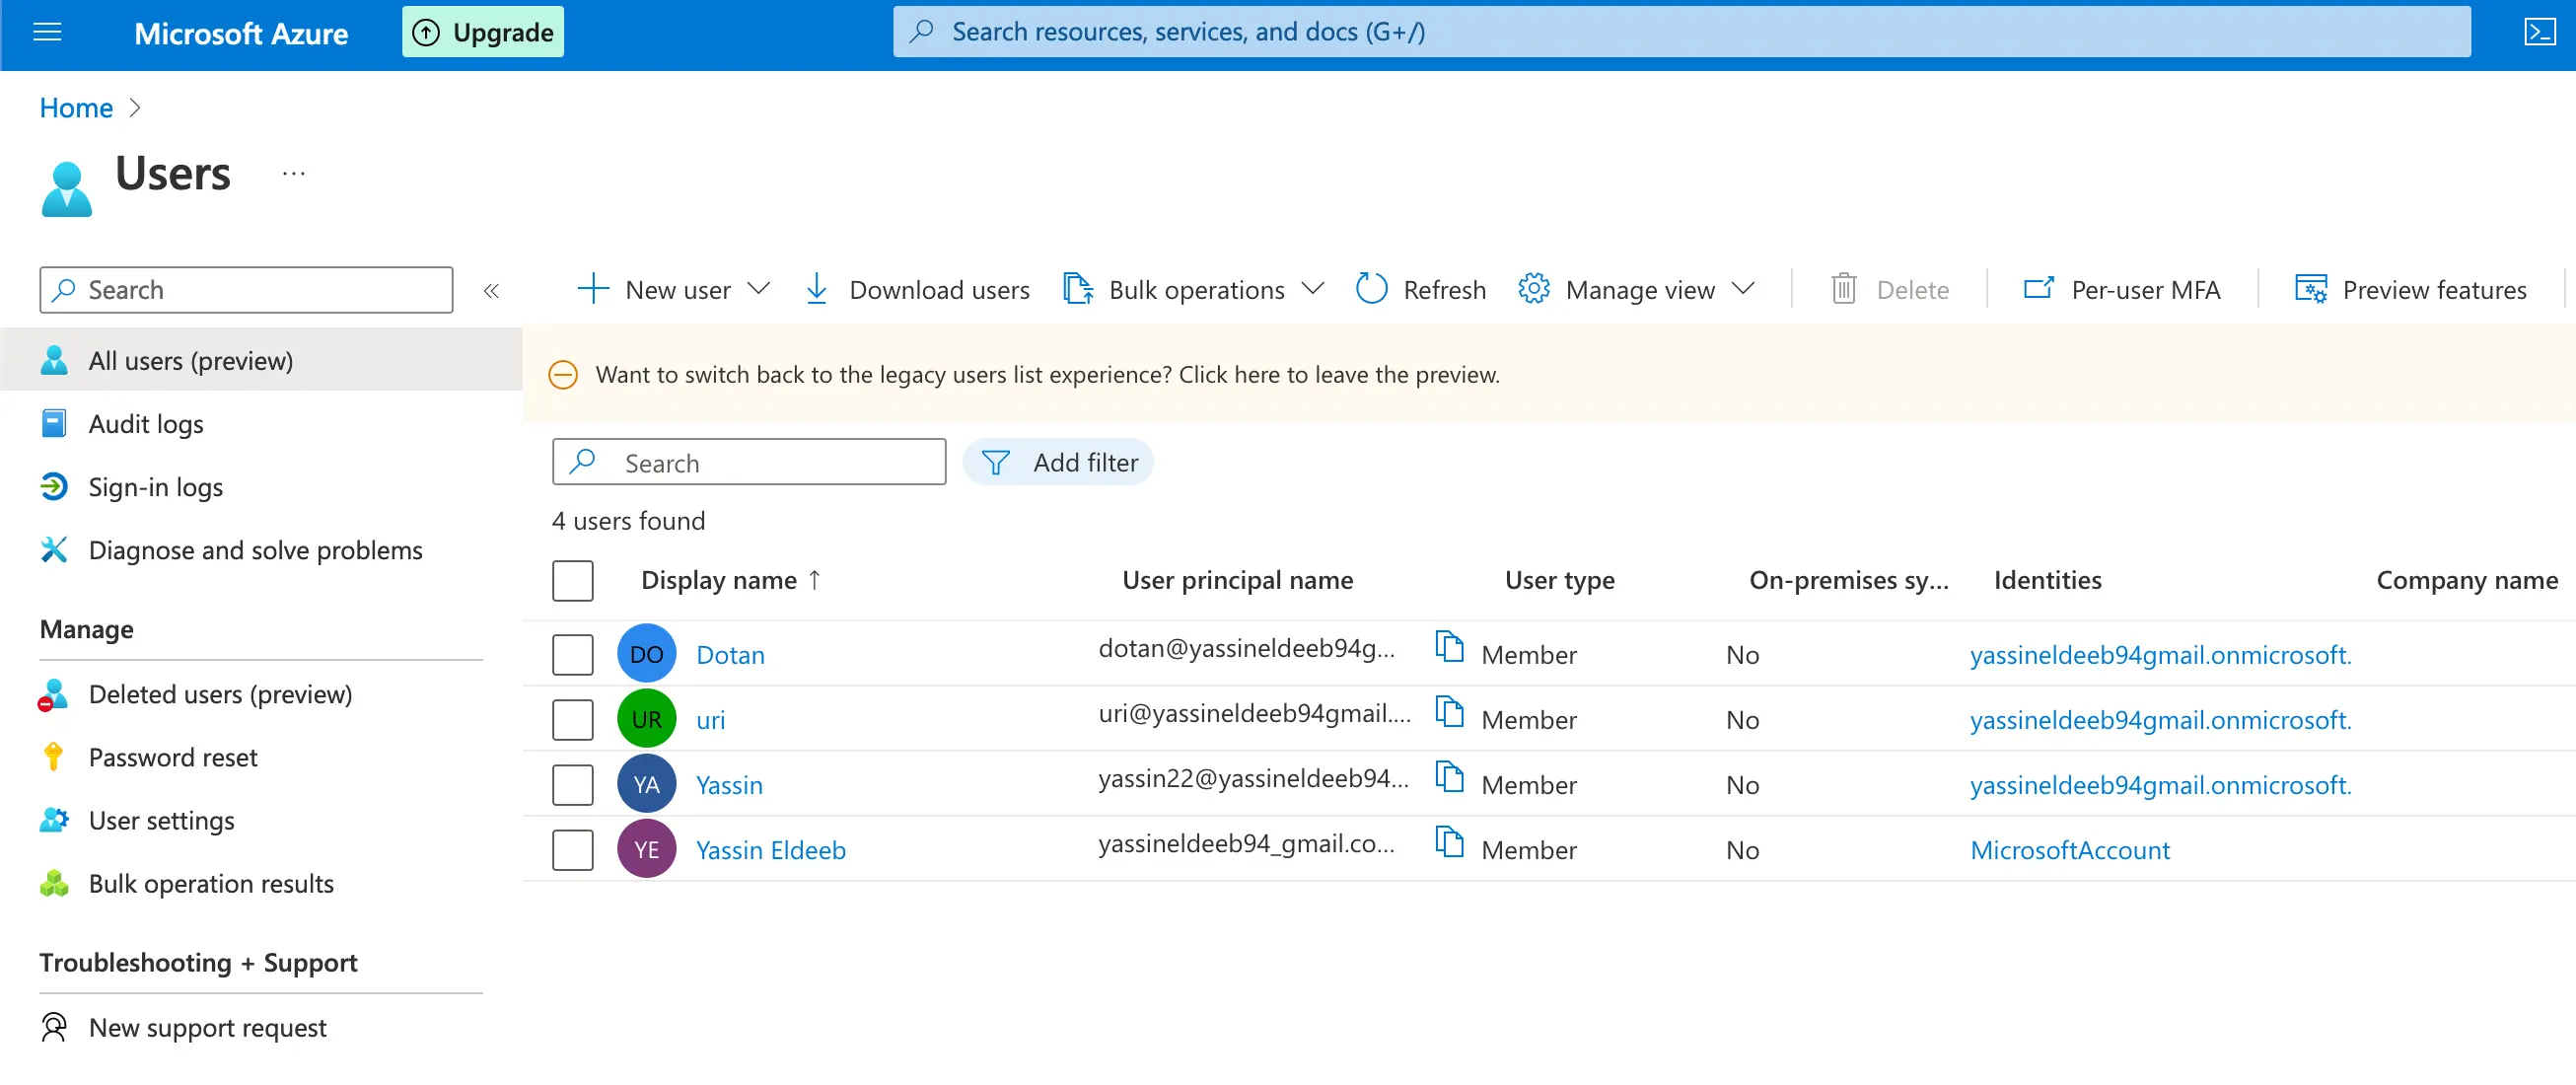
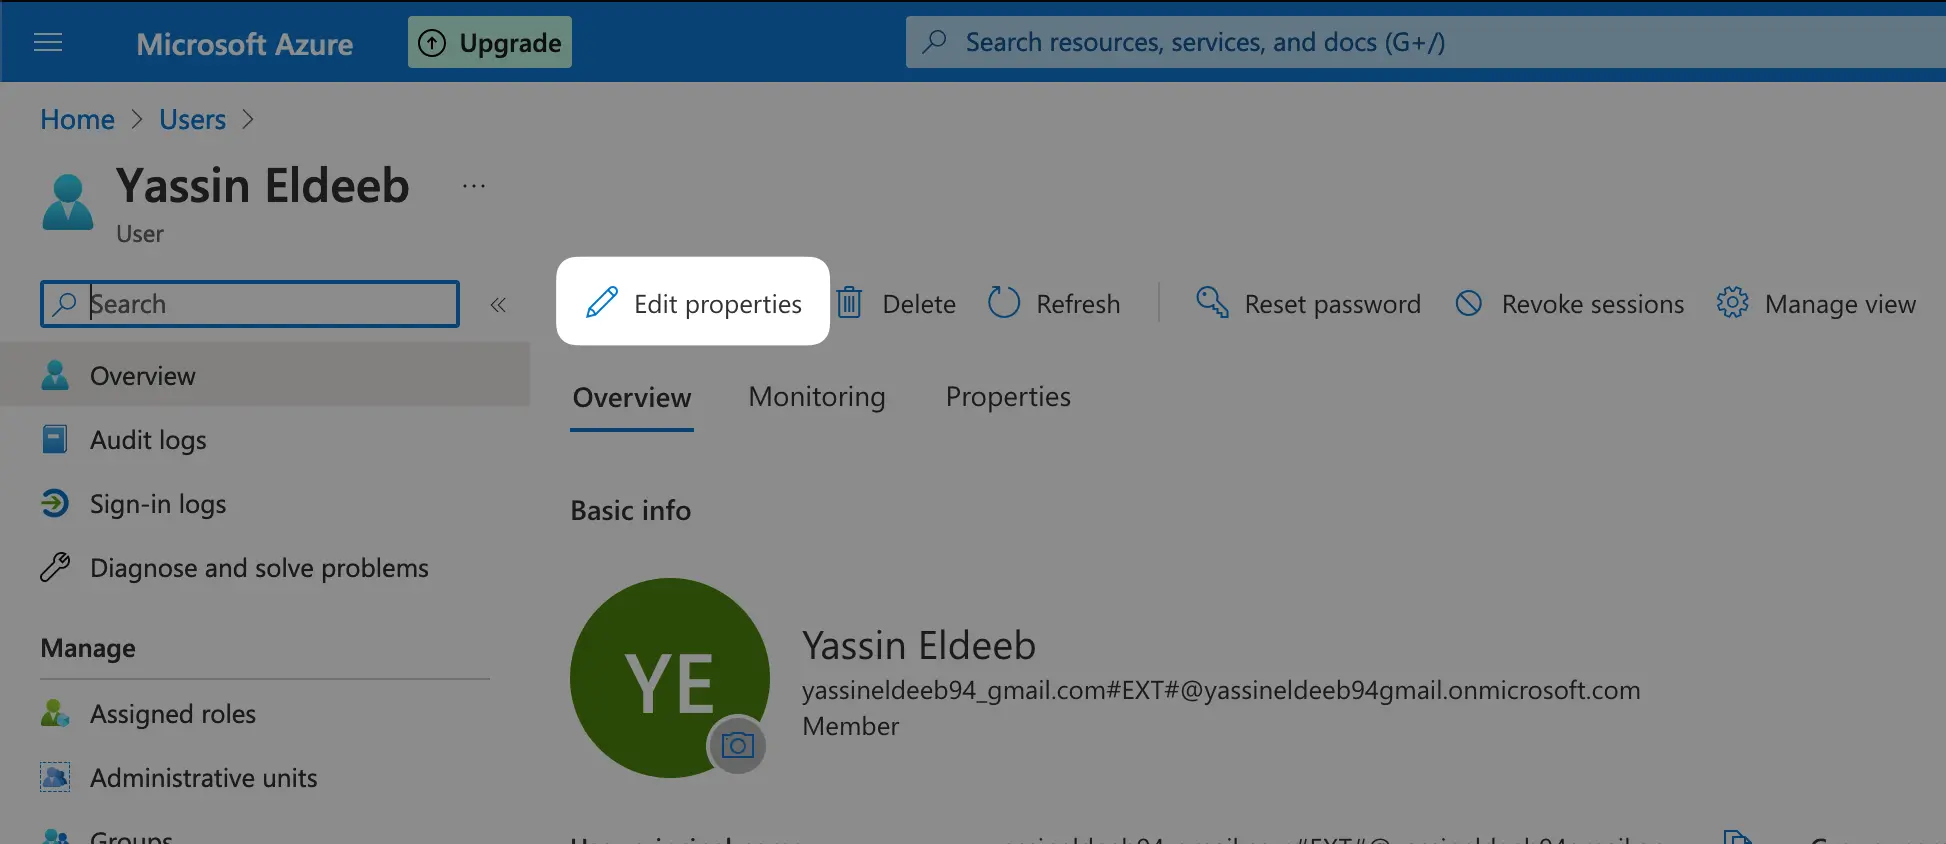
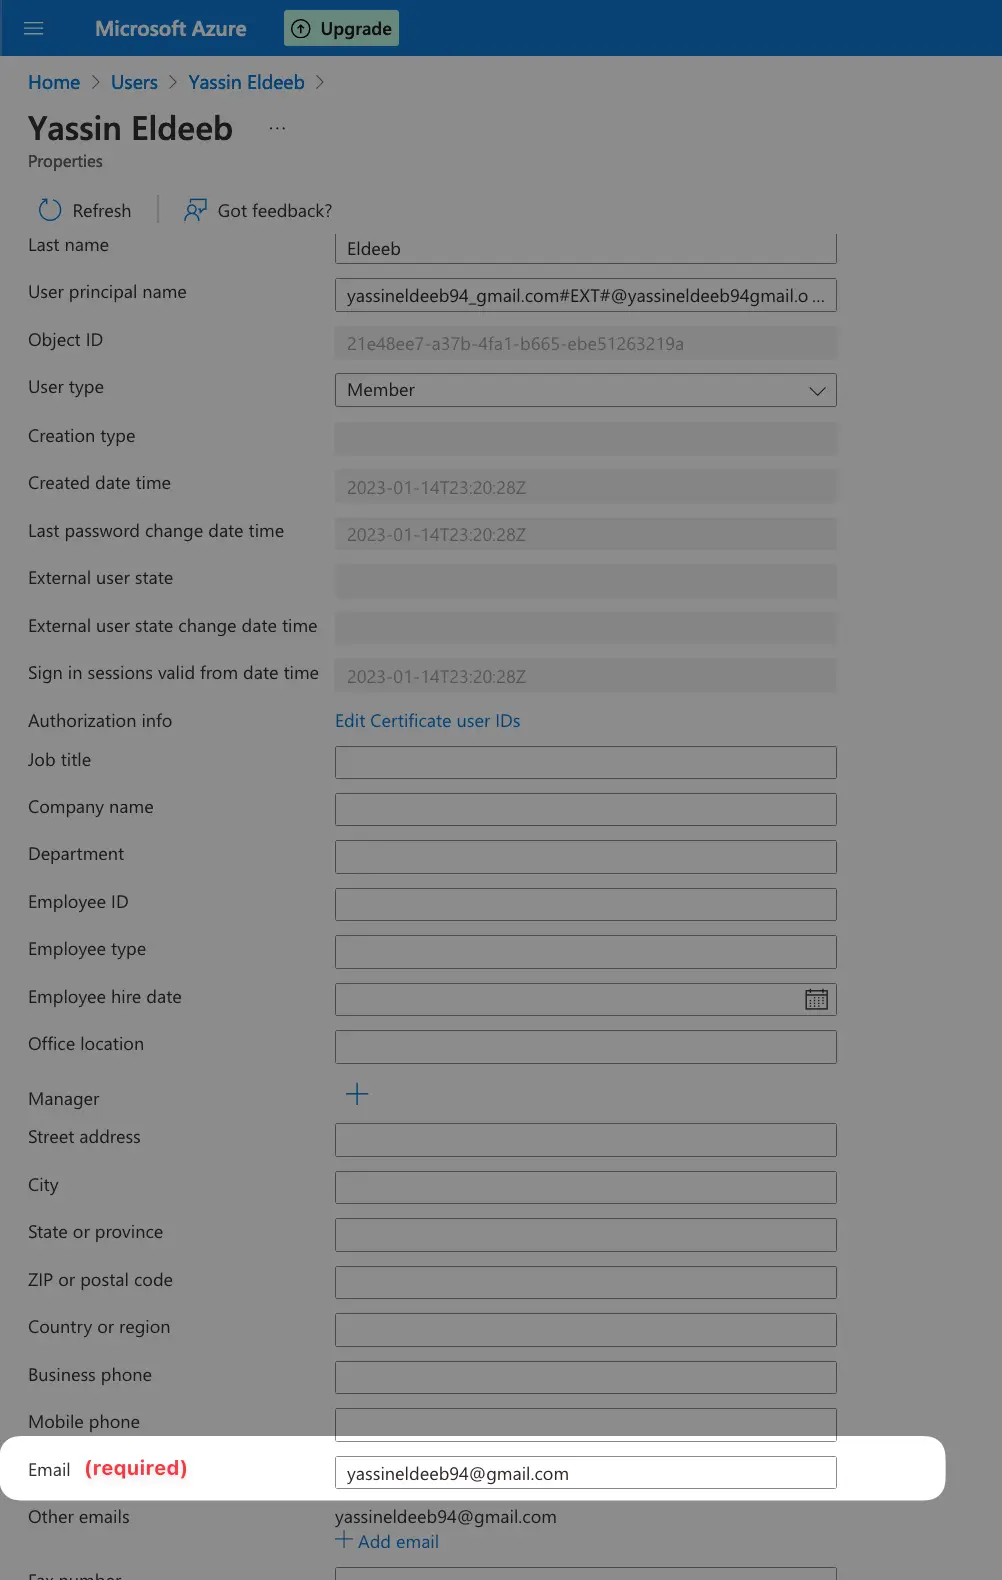
If your Azure AD members does not have the email field set, the login will fail. You can follow
the steps in the screenshots below to be able to add an email for an existing user record.

And congrats, you now have Azure AD connected! 🎉
You can use the link provided in the modal right section to let your users login via Azure AD.