Self-Hosting Hive Console
If you are not able to use the cloud provided Hive Console service, you can self-host it. The self-hosted version is free and open-source. You can find the full source code on GitHub.
Self-hosting Hive Console does currently not support all of the features as the hosted version.
The following features are currently unavailable when self-hosting:
- High-Availability CDN (a replacement is available)
- Billing (payment integration)
If you’re interested in hosting one of our gateway solutions, see the documentation for Hive Router or Hive Gateway.
Pre-Requisites
The easiest way of running Hive Console is using Docker and docker-compose.
All the services required for running Hive Console are published to the GitHub container registry (GraphQL Hive Docker Images).
Please make sure to install the Docker daemon as well as docker-compose on your machine before
proceeding.
Self-Hosting Architecture
When self-hosting Hive Console, you are responsible for running and maintaining the following components:
- PostgreSQL database
- Kafka (or any other Kafka-compatible solution, like Azure Event Hubs)
- ClickHouse database
- Redis
- SuperTokens instance
- S3 storage (or any other S3-compatible solution, like minio or CloudFlare R2)
- Hive microservices
The default configuration of the self-hosted environment comes with a single instance of each database.
For production environments, we recommend replacing the in-cluster databases (PostgreSQL, Kafka and ClickHouse) and storage (S3) with managed database/storage (Cloud-based or in-house).
Architecture Diagram
The following diagram shows the architecture of a self-hosted Hive Console instance:
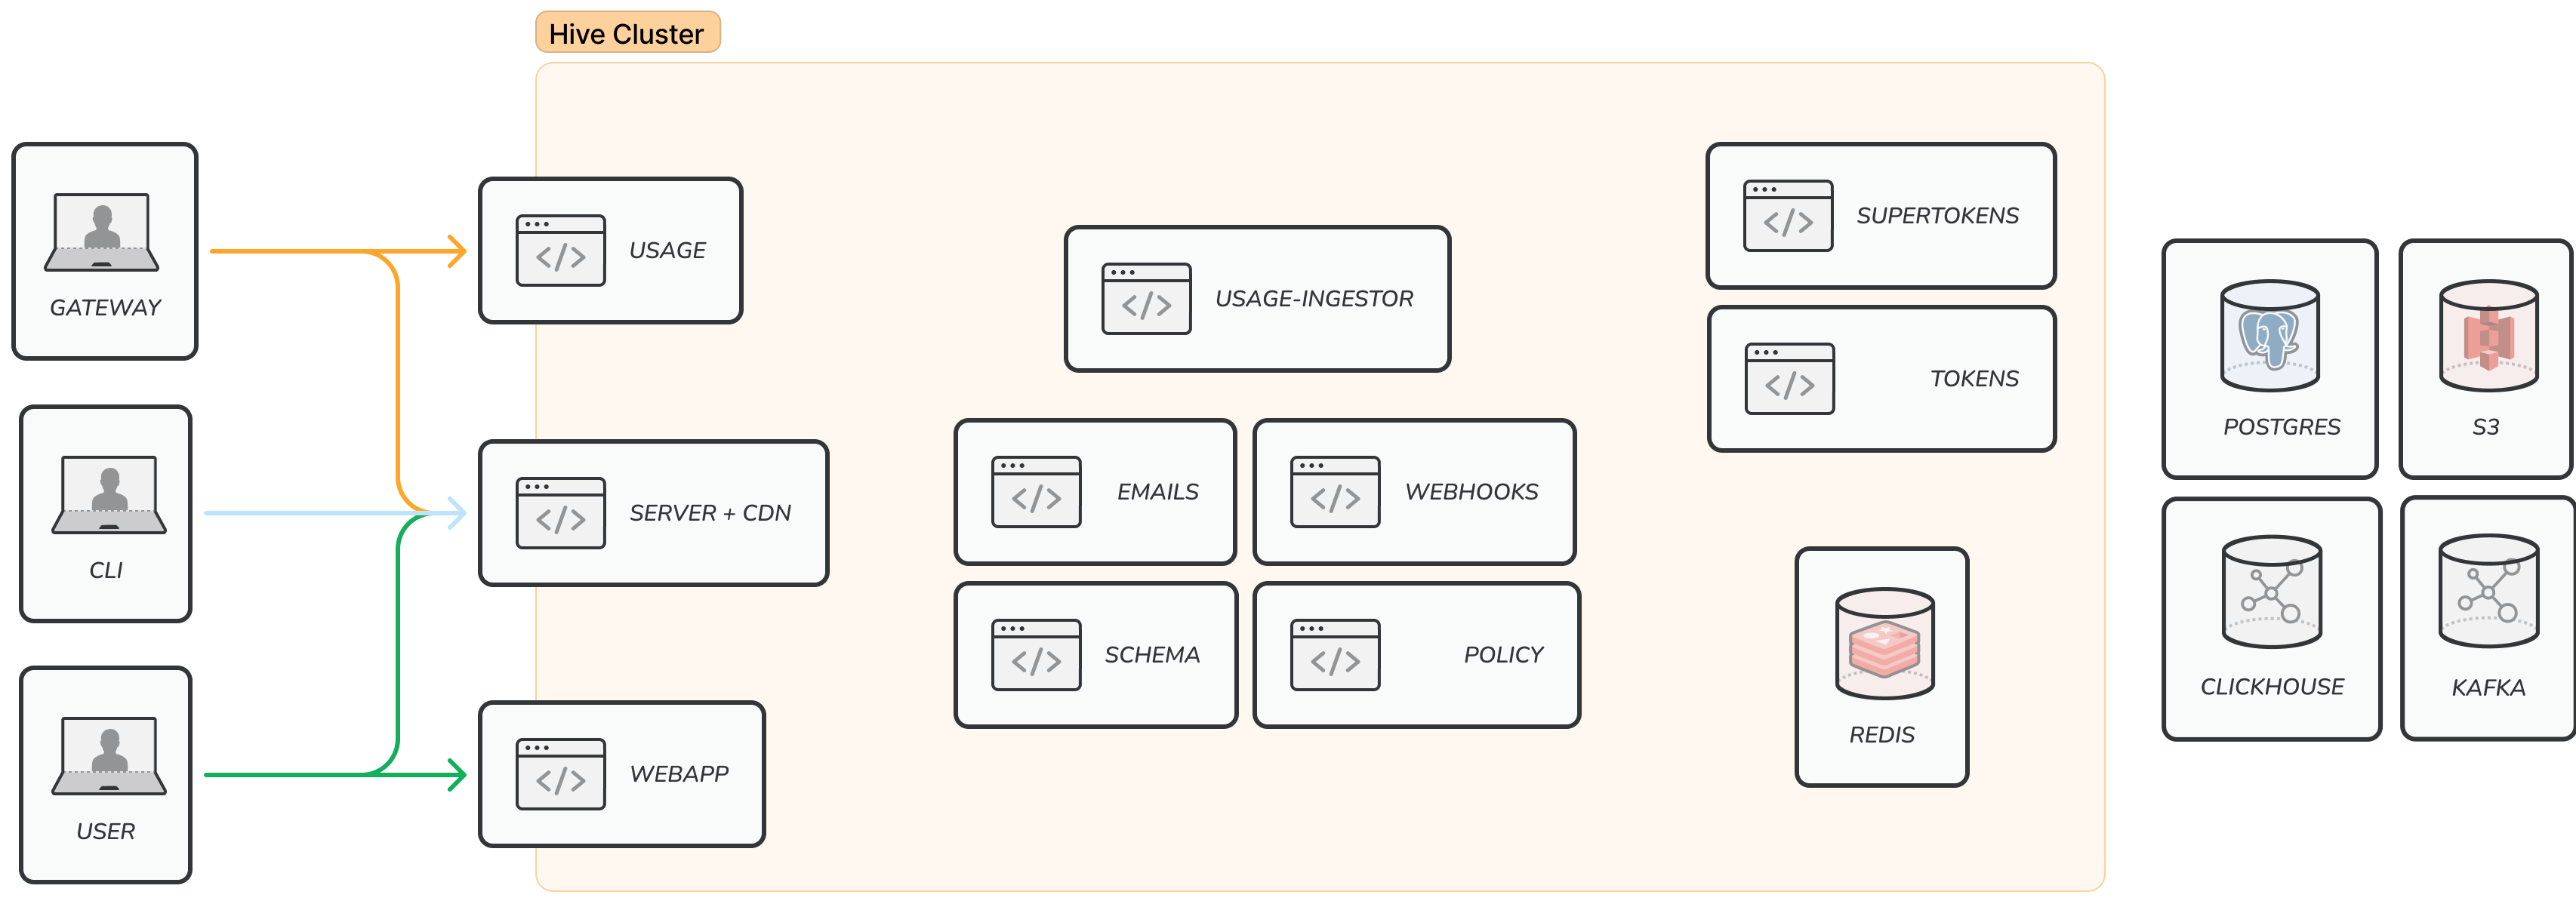
Services Overview
The dependencies between the different services are described in the
docker-compose.community.ymlfile.
Databases / Storage
- PostgreSQL database: stores all core data, including: users, GraphQL schemas, schema checks, projects, targets, organizations and configurations.
We recommend using PostgreSQL version 16. While older versions (14, 15) may still work, we recommend using 16 as this is the version we using for the cloud version of Hive.
- Redis: deployed as in-cluster, used for mainly for short-term caching.
- ClickHouse database: stores all GraphQL operations usage data.
- Kafka: high-throughput message queue, used for sending usage data to the usage-ingestor service.
- S3 storage: used for storing GraphQL schema artifacts (e.g. GraphQL SDL / Supergraph SDL and CDN access tokens).
Microservices
- SuperTokens: an open-source project used for authentication and authorization.
webapp: the main Hive Console web application.server: the main Hive Console server, responsible for serving the GraphQL API and orchestrating calls to other services.- CDN: a custom CDN service, responsible for serving the GraphQL schema artifacts. In
self-hosted architecture, the CDN is provided as part of the
server. schema: the Hive Console schema service, responsible for validating, composing and building GraphQL schemas.tokens: the Hive Console tokens service, responsible for generating and validating tokens.usage: the Hive Console usage service, responsible for receiving usage data from a running GraphQL server, and prepare them for processing.usage-ingestor: the Hive Console usage-ingestor service, responsible for processing usage data and storing them in ClickHouse.emails: the Hive Console emails service, responsible for sending emails.webhooks: the Hive Console webhooks service, responsible for sending webhooks to external services.policy: the Hive Console policy service, responsible for validating and enforcing schema policies.
Utility services
In addition to the core services and databases, the default self-hosted architecture comes with the following utility services:
zookeeper: a centralized service and is used to maintain naming and configuration data for Kafka.s3_provision_buckets: a utility container that is used to provision the required S3 buckets.s3_reverse_proxy: a utility container that is used to proxy requests to the S3 storage.migrations: a utility container that is used to run database migrations for Hive’s application (both PostgreSQL and Clickhouse).
Quick Start Video
In this video you will learn how to run Hive Console and publish your first schema on your machine in less than 15 minutes.
Running Hive Console
First download the docker-compose.community.yml file from the
GitHub repository
using wget or curl. This’s going to download the latest version available.
Note: make sure you’ve Docker installed to be able to continue with the setup process.
You can also download the file directly from GitHub, if you don’t have wget or curl installed
using the link below
curl -O https://raw.githubusercontent.com/graphql-hive/console/hive@9.5.0/docker/docker-compose.community.ymlAfter downloading the docker-compose.community.yml file, this includes all the services required
for running Hive locally in a self hosted environment. But before we can spin it up, we first need
to set some environment variables.
Docker images are built and published for each version of Hive Console and tagged accordingly.
You can find all the available versions on the GitHub Releases page prefixed with hive@.
We recommend sticking to a specific version to avoid breaking changes. The latest version
corresponds to the latest stable release.
export DOCKER_TAG=":9.5.0"After picking a version set the DOCKER_TAG environment variable to that value.
export DOCKER_REGISTRY="ghcr.io/graphql-hive/"
export DOCKER_TAG=":9.5.0" # Pin this to an exact version
export HIVE_ENCRYPTION_SECRET=$(openssl rand -hex 16)
export HIVE_APP_BASE_URL="http://localhost:8080"
export HIVE_EMAIL_FROM="no-reply@graphql-hive.com"
export SUPERTOKENS_API_KEY=$(openssl rand -hex 16)
export CLICKHOUSE_USER="clickhouse"
export CLICKHOUSE_PASSWORD=$(openssl rand -hex 16)
export REDIS_PASSWORD=$(openssl rand -hex 16)
export POSTGRES_USER="postgres"
export POSTGRES_PASSWORD=$(openssl rand -hex 16)
export POSTGRES_DB="registry"
export MINIO_ROOT_USER="minioadmin"
export MINIO_ROOT_PASSWORD="minioadmin"
export CDN_AUTH_PRIVATE_KEY=$(openssl rand -hex 16)
We recommend saving the environment variables in a file that you can reuse later. E.g. a .env file that you
can later on expand using source .env. We are using openssl here for generating passwords on the fly.
You can also embed the values within a new docker-compose file by running the following command after setting the environment variables.
docker compose -f docker-compose.community.yml config > docker-compose.with-env.ymlAfter setting the environment variables, pull the required images for Hive Console services. This’s going to take some time if you’re doing it for the first time.
docker compose -f docker-compose.community.yml pull
# or if you embedded the environment variables into your docker-compose file
docker compose -f docker-compose.with-env.yml pull
After it’s done, you can start the Hive Console services using docker compose.
docker compose -f docker-compose.community.yml up
# or if you embedded the environment variables into your docker-compose file
docker compose -f docker-compose.with-env.yml up
Wait until all the services are up and running.
Congratulations 🥳, you just started your own Hive Console instance.
You’ll notice the folder named .hive at your root directory that has been mounted from docker
representing the volumes for the different storages used by Hive services like postgres and
minio, etc… So yes data are currently local but we’ll discuss that further more in the
Next Steps section.
Note: deleting this directory will end up with a loss of data, as this directory is acting as a volume for storing the data from Hive dependencies: database and storage
Testing Hive Console
Visit http://localhost:8080 in your browser and start using Hive Console! The usage reporting
endpoint is bound to http://localhost:8081. The GraphQL API is bound to http://localhost:8082.
The artifacts bucket is bound to http://localhost:8083.
Firstly, you can head to http://localhost:8080 in your browser and start using Hive Console!
You’ll need to Sign Up for an account by inputting your email and password. And once you do you’ll
see your personal organization that has been automatically created for you by default.
Creating first project and target
Now that we have Hive Console setup locally, signed up and logged into our dashboard. We can start creating our first project which we’re going to push graphql schemas to.
So you’re going to click on the Create a Project button on the top right, give it a name and
choose your project type. You’re going to see all sorts of types Single which is the most common
and there’re also Federation and Stitching but what’s also nice is that you can define your own
custom endpoints for schema validation and schema building. I’m going to go with Single but you
can choose what best suits your needs. Then click Create Project, you’re going to be redirected to
your project page where you’re going to see 3 listed targets created for you by default:
developmentproductionstaging
We’re going to use the development target in this guide and as soon as you click it you’ll see
this message:
Hive is waiting for your first schema.
You can publish a schema with Hive CLI and Hive Client
Create a schema.graphql file wherever you want, you can put it at the root for example with any
simple graphql schema like the following:
type Query {
  hello: String!
}
Setting up a local project
You also need to have a git repository initialized for your project, because Hive automatically uses the last commit hash to determine who the author is and ties the schema with the commit hash. So we’re going to do that.
git initMake sure you exclude the following in your .gitignore file, because you don’t wanna push those in
your commits:
.hive
hive.json
.env
Make sure to at least have a single commit so that Hive can associate the schema with it.
git add .
git commit -m "init"
Installing Hive CLI
Now that you’ve your project setup, start by installing the Hive CLI which we’re going to use to interact with Hive’s server.
After installing it, you can check the version of the CLI, to make sure it’s installed correctly.
hive --versionPublishing your first schema
And since we’re using the Self Hosted version, we need to configure the Hive CLI to use our local
endpoint, by creating a hive.json file at the root of your directory. Then specify the registry
key to point it our local registry instead of the cloud version one and the value is going to be
http://localhost:8082/graphql where its running.
Additionally the schemas registry only allows trusted sources to be able to push to them, so we have
to create an access token by heading back to our project page, specifically on the target(in this
guide it’s development) then go to the settings tab, if you scroll donw a bit you’re going to see
the Tokens section, click the Generate New Token button, give it a name then we’ll have to set
some permissions for that token, so expand the All targets section then give the Registry a
Read & Write access. Click the Generate Token button, then copy the token value. Head back to
the hive.json config file then add the following contents, while replacing the
<your-access-token> with the token value you just copied.
{
  "registry": {
    "endpoint": "http://localhost:8082/graphql",
    "accessToken": "<your-access-token>"
  }
}
Now we’re all setup to use the Hive CLI against our Setup!
We can publish our first schema by using:
hive schema:publish ./schema.graphqlGo to the Schema tab in your project target and you’re going to see your latest published schema.
Bounded Ports Reference
| Port | Purpose |
|---|---|
| 8080 | Hive’s Main App UI |
| 8081 | The Usage Reporting Endpoint |
| 8082 | The GraphQL API |
| 8083 | The Artifacts Bucket |
Next Steps
After doing your first testing with Hive Console you should consider the following steps:
- Evaluate whether you want to run Databases yourself within Docker or instead use a managed database service.
- Set up backups for your data.
- Set up a CD pipeline for deploying Hive Console to your Cloud Provider or bare-metal server of choice (e.g. a Kubernetes cluster or Docker Swarm)
- Set up a monitoring solution for your Hive Console instance (leverage healthchecks, sentry error reporting, prometheus metrics, etc.).
- Configure the
emailsservice to use a real email provider (by default it usessendmail). - Watch and follow the Hive Console GitHub repository for new releases and updates.
- Set up a weekly reminder for updating your Hive Console instance to the latest version and applying maintenance.
- Get yourself familiar with SuperTokens and follow their changelogs in order to keep your SuperTokens instance up-to-date.
- In order to use longer retention periods e.g. for conditional breaking changes or schema explorer
overviews do the following: Open the postgres database, go to the table
organization, find your organization and changeplan_nameto ENTERPRISE,limit_operations_monthlyto 0 andlimit_retention_daysto a value between 0 and 360 in order to unlock full functionality.
You can review the configuration options of all the services in the corresponding Readme files.